Introduction to PXYEDGE Documentation

Welcome to the official PXYEDGE documentation center. Here you will find configuration guides, tutorials, and technical reference to help you set up, configure, and maximize the performance of our premium proxy services.

What are Proxies?
Premium proxies act as intermediary servers that route your internet traffic through a global network of IP addresses, providing access, anonymity, and geo-unrestricted web access for business and professional use cases.

Available Proxy Services

  • Rotating Residential Proxies - real residential IPs with automatic rotation.

Documentation Structure

Getting Started

How to set up, configure and test proxies.

Configuration

Tutorials for location targeting, sessions and whitelist options.

API Integration

Endpoint references and automation examples.

Support

Troubleshooting and frequently asked questions.

Free Trial

If you register an account with Pxyedge on behalf of a company, you may be eligible for a free trial period and can receive trial traffic for connection testing and evaluation.

  • Free trial access is available after registration and account verification.
  • Trial traffic is intended for testing configuration, latency and proxy quality.
  • Production or high-volume workloads should use a paid plan.

Platforms and Conditions

Trial bandwidth and available regions may vary depending on account type, verification status and current availability.

Getting Started with PXYEDGE Proxies

Make a request to using a residential proxy from a random location through our entry. Replace USERNAME and PASSWORD with your proxy user credentials. Keep in mind that each request returns a new IP address as PXYEDGE Rotating Residential Proxies rotate automatically. Our Residential Proxies support HTTP, HTTPS, and SOCKS5 protocols.

Basic Request

Here is an example of a basic request that goes through a proxy from a random location:

curl -x socks5://USERNAME-zone-custom-region-US:PASSWORD@128.14.209.70:3000 ipinfo.io

Note: Replace USERNAME and PASSWORD with your actual proxy credentials.

State Targeting

Here is another example of a request that goes through a proxy from California, United States. Adding region-US-st-CA to the username string enables you to specify a state.

curl -x socks5://USERNAME-zone-custom-region-US-st-CA:PASSWORD@128.14.209.70:3000 ipinfo.io

Session Control

If you need to keep the same proxy for more than one request, use a session control. Add session-abcd1234 to your username string, where abcd1234 can be any random string, and as long as you keep sending requests with this string (session ID), you will get the same proxy IP.

curl -x socks5://USERNAME-zone-custom-session-abcd1234:PASSWORD@128.14.209.70:3000 ipinfo.io

Support

If you have any additional questions, please contact our support team at service@pxyedge.com.

Rotating Residential Proxies

This section explains how to make requests, configure location targeting, control sessions and whitelist IPs when using rotating residential proxies.

Making Requests

Residential proxies can be used through standard HTTP clients, browsers, scraping frameworks and automation tools. They appear as real users and help reduce blocks during automated collection.

Basic query

Build a request with authentication and optional location parameters.

Parameter Description
youraccount Proxy account youraccount
zone Name for IP pool
region Country/region, random region without this parameter
st The state you want to specify
city The city you want to specify
session Session string for sticky IPs

Country

Adding a region flag to the authorization header enables country-level targeting. If the local IP pool is unavailable, traffic may be routed through a nearby available region.

region-US
region-BR
region-IN
region-GB
region-CA 
region-AU

All countries are in uppercase abbreviations.For example, a proxy in Brazil can be requested with region-BR.

State

State targeting is useful when you need a more precise area within a country.

region-US-st-CA 
region-US-st-NY
region-US-st-TX

For example, targeting California can use region-US-st-CA.

Session Control

By default, generated sessions are valid for a period of time and support multiple requests. Reusing the same session helps keep one IP during multi-step automation.

youraccount-zone-session-random123
youraccount-zone-session-random123-sesstime-10

The same session value can be reused until the session expires or is actively released.

Whitelisting IPs

IP whitelisting allows you to access the residential proxy pool simply by connecting from an authorized IP. You can configure whitelist access in the dashboard.

  1. Access the dashboard and open Account Settings.
  2. Add the IP address of your proxy client or server.
  3. Wait for synchronization and then test the proxy request.
{
  "code": 0,
  "data": {
    "whitelist": ["203.0.113.10"]
  }
}
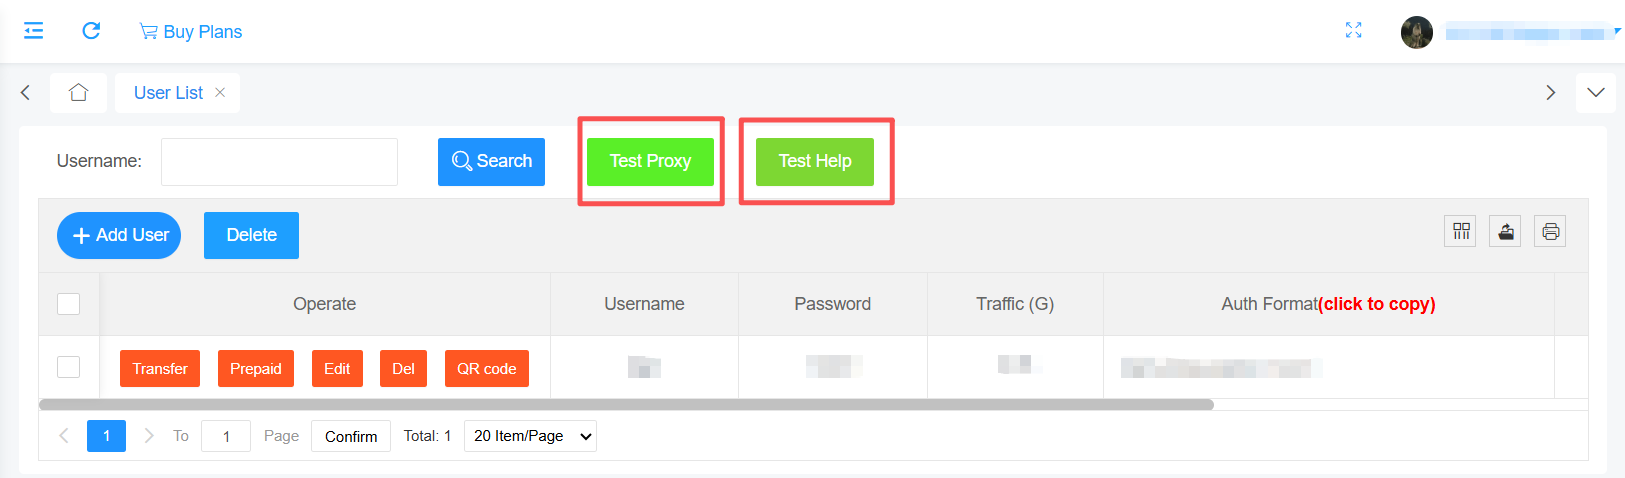
Click the Test Proxy

test-help-documentation

Test Example 1:

Test Command :

curl -x socks5://youraccount-zone-custom:yourpassword@128.14.209.70:3000 https://ipinfo.io

(no location is specified, an IP will be assigned randomly.)

Basic CMD Format:youraccount-zone-custom:yourpassword

  • youraccount – The youraccount of the sub-account
  • yourpassword – The password of the sub-account

Test URL – @128.14.209.70:3000 https://ipinfo.io

Test Example 2:

Specify Country, Region, and Session

If you want to specify a country, region, and session, the following parameters will be appended to the basic CMD format:

-region-country-st-region-session-yoursession-sessTime-minutes

Example command 1:

curl -x socks5://youraccount-zone-custom-region-country:yourpassword@128.14.209.70:3000 https://ipinfo.io

Example command 2:

curl -x socks5://youraccount-zone-custom-session-yoursession-sessTime-minutes:yourpassword@128.14.209.70:3000 https://ipinfo.io

Example command 3:

curl -x socks5://youraccount-zone-custom-region-country-st-region-session-yoursession-sessTime-minutes:yourpassword@128.14.209.70:3000 https://ipinfo.io

Parameter description:

  • "country" : Specify country which you want to use
  • "region" : Specify region which you want to use
  • "yoursession" : the session you set(User-defined string, 7–9 characters long, alphanumeric only.)
  • "sessTime" : Session Time you set

For Example

youraccount: David        Password: David1

Specify Country: Afghanistan(AF)        Specify Region: Balkh(BAL)

Session: david0              Session Time: 5

Then the cmd will be generated :

curl -x socks5://David-zone-custom-region-AF-st-BAL-session-david0-sessTime-5:David1@128.14.209.70:3000 https://ipinfo.io

(Select a "AF" IP and keep the session active for 5 minutes. By default, if the client disconnects, the IP will automatically change.)

(Some regions may currently have fewer active IPs online.
It is recommended to remove -st-region or try connecting to a different region.)

Preparations Before Using-Chrome

Browser Proxy Setup Guide

📋 Preparations Before Using Pxyedge IP Proxy — Google

1. Install Google Chrome

Official download: https://www.google.com/intl/en_us/chrome/
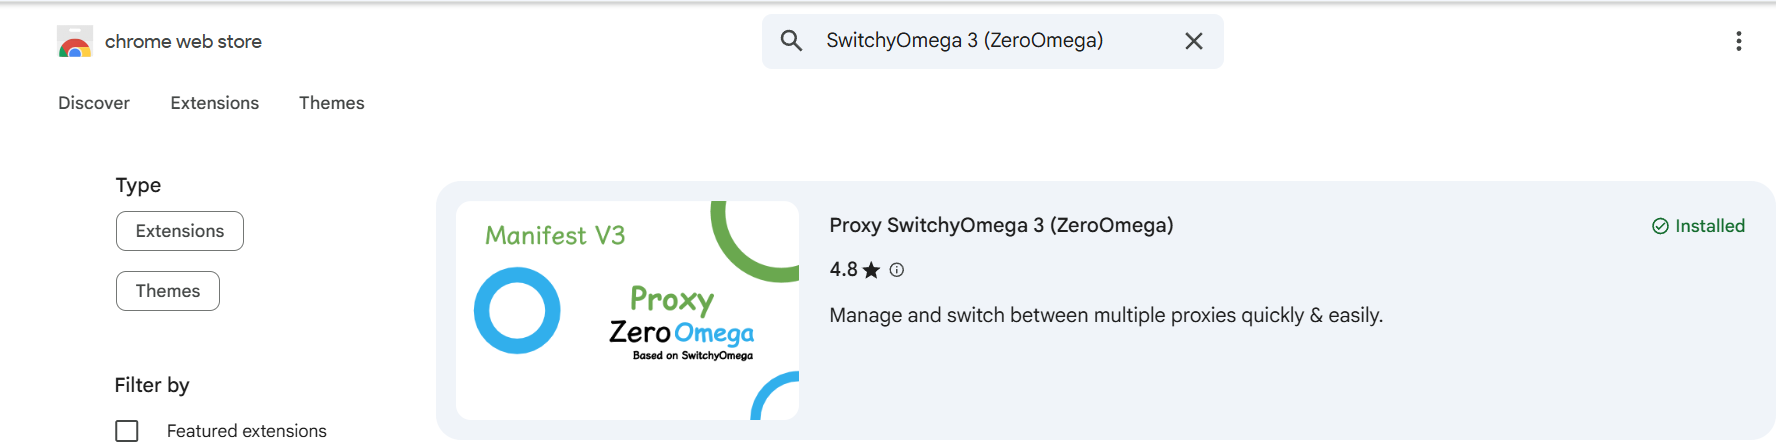
2. Install the proxy extension Proxy SwitchyOmega 3 (ZeroOmega)

ZeroOmega Extension in Chrome Web Store

image1: ZeroOmega Extension in Chrome Web Store

Note: This add-on is maintained by a third-party developer. Make sure you trust the source before installing.
⚙️ Start Configuring Pxyedge IP Proxy

Step 1: Open Extension Settings
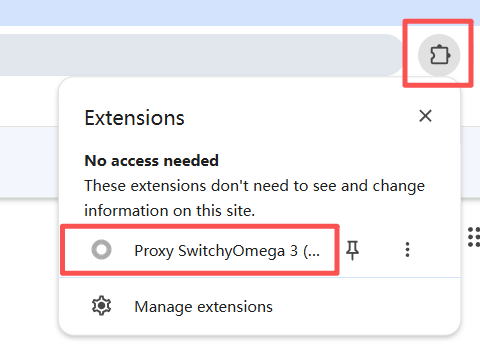
  1. Click the Extensions icon in the Chrome toolbar
  2. Find and click "Proxy SwitchyOmega 3 (ZeroOmega)"
  3. Click "Options" to enter the settings page

Find Proxy SwitchyOmega in Extensions Menu
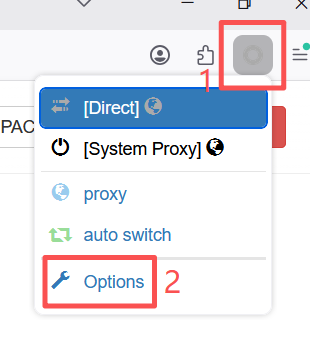
image2: Find Proxy SwitchyOmega in Extensions Menu

Click Options in ZeroOmega Menu

image3: Click Options in ZeroOmega Menu
Step 2: Configure Proxy Server
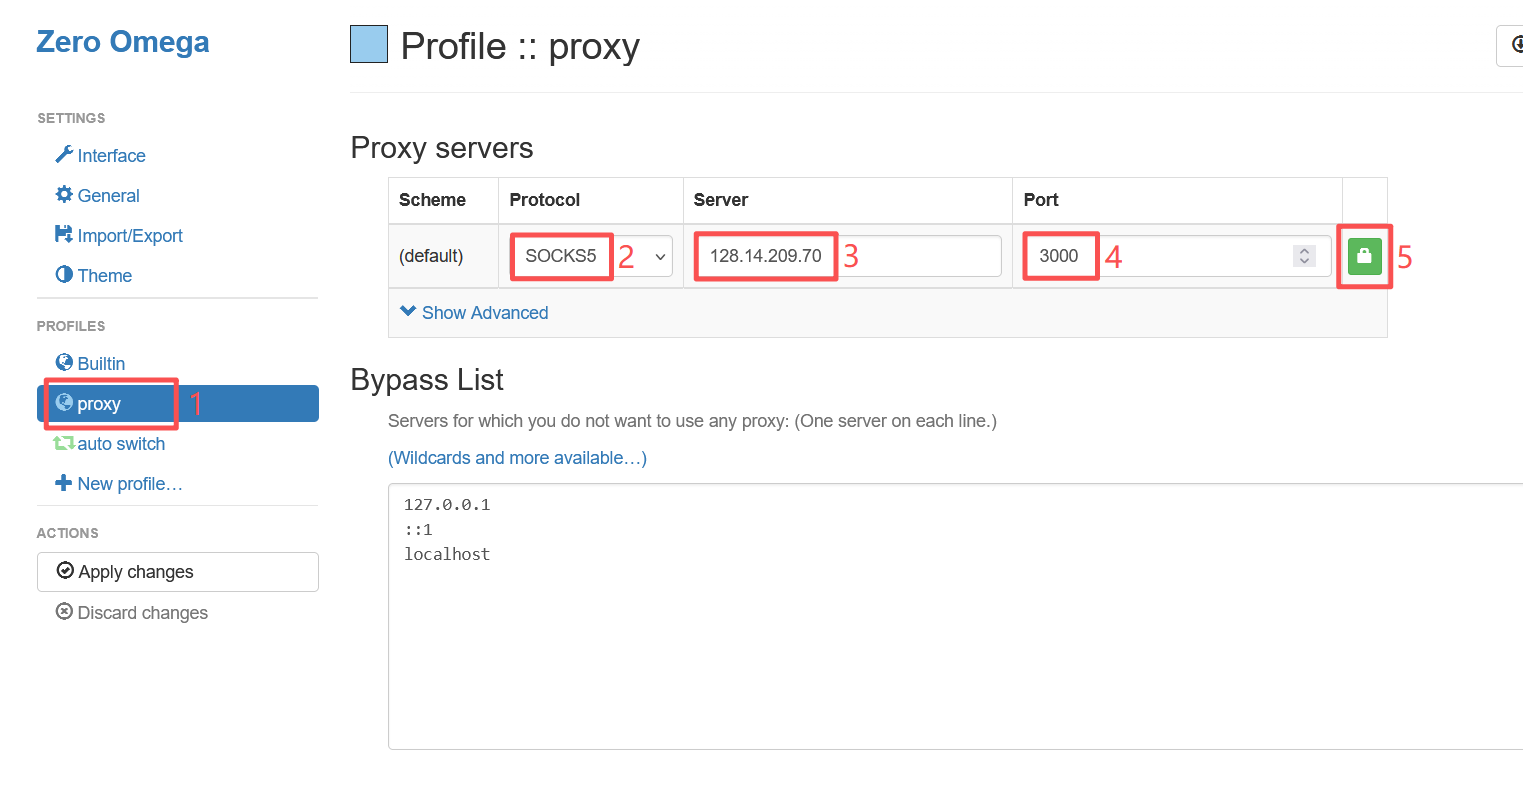
  1. Click "proxy" in the left PROFILES menu
  2. Select the Protocol (HTTP, HTTPS, SOCKS4, or SOCKS5) — verify your browser supports the required network protocols and choose accordingly
  3. Enter proxy server IP: 128.14.209.70
  4. Enter port number: 3000
  5. Click the Authentication button (lock icon)

Proxy Server Configuration Interface

image4: Proxy Server Configuration Interface
Step 3: Authentication
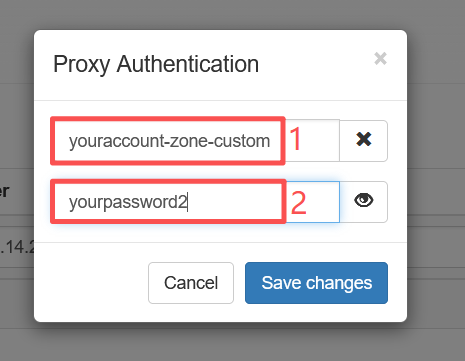
  1. Enter your account name, followed by -zone-custom
  2. Enter your password
  3. Click "Save changes"

Proxy Authentication Popup

image6: Proxy Authentication Popup

Important: Please strictly follow the account format requirements in the help documentation to fill in the username. Incorrect format will cause the proxy to not work properly.

Detailed instructions: https://pxyedge.com/documentation/Click-the-Test-Proxy

Step 4: Apply Configuration

Click the "Apply changes" button in the left ACTIONS menu to save and apply all configuration changes.
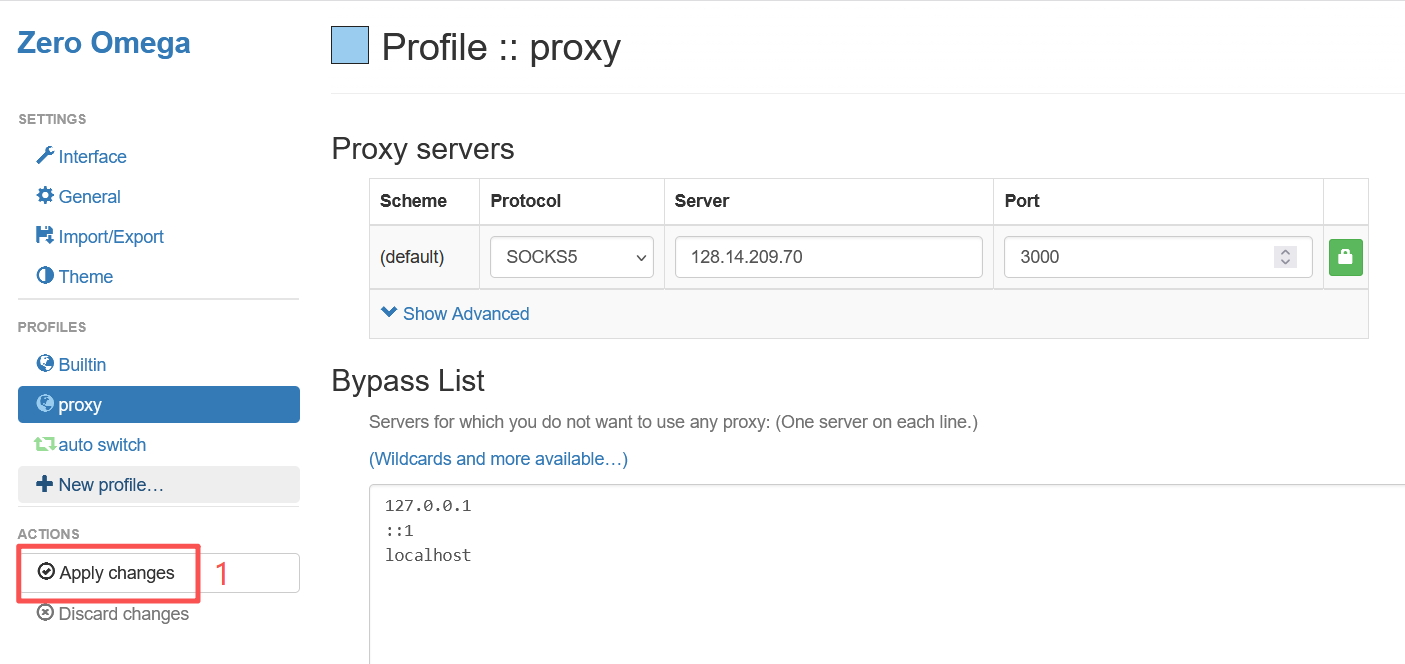
Apply Changes Button

image7: Apply Changes Button

🚀 Use the Proxy

Click the Zero Omega icon in the Chrome toolbar, then select "proxy" to enable the proxy. Select "Direct" for direct connection without proxy.
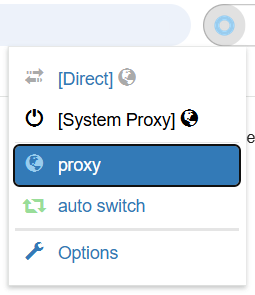
Enable Proxy

image8: Enable Proxy

✅ Test the Proxy

Visit the following address to verify if the proxy is working:

https://ipinfo.io/what-is-my-ip
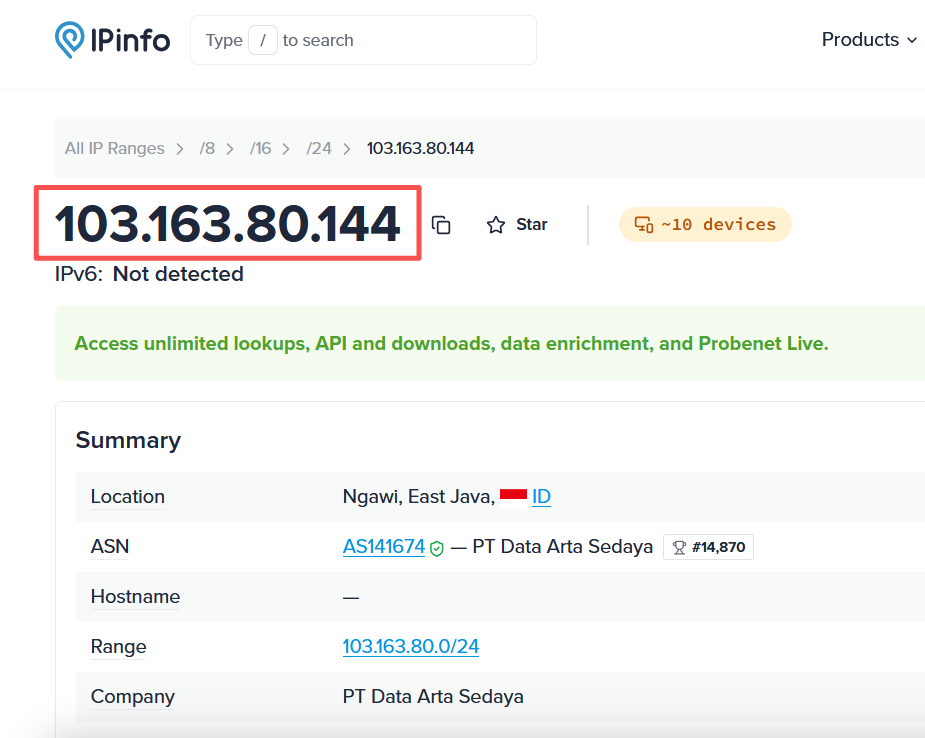
IP Test Result on ipinfo.io

image9: IP Test Result on ipinfo.io

Verification Successful: If the displayed IP address matches the proxy server IP you configured, the proxy is successfully configured and working properly.


Preparations Before Using-Firefox

Browser Proxy Setup Guide

📋 Preparations Before Using Pxyedge IP Proxy

1. Install the Firefox browser

Official download: https://www.firefox.com
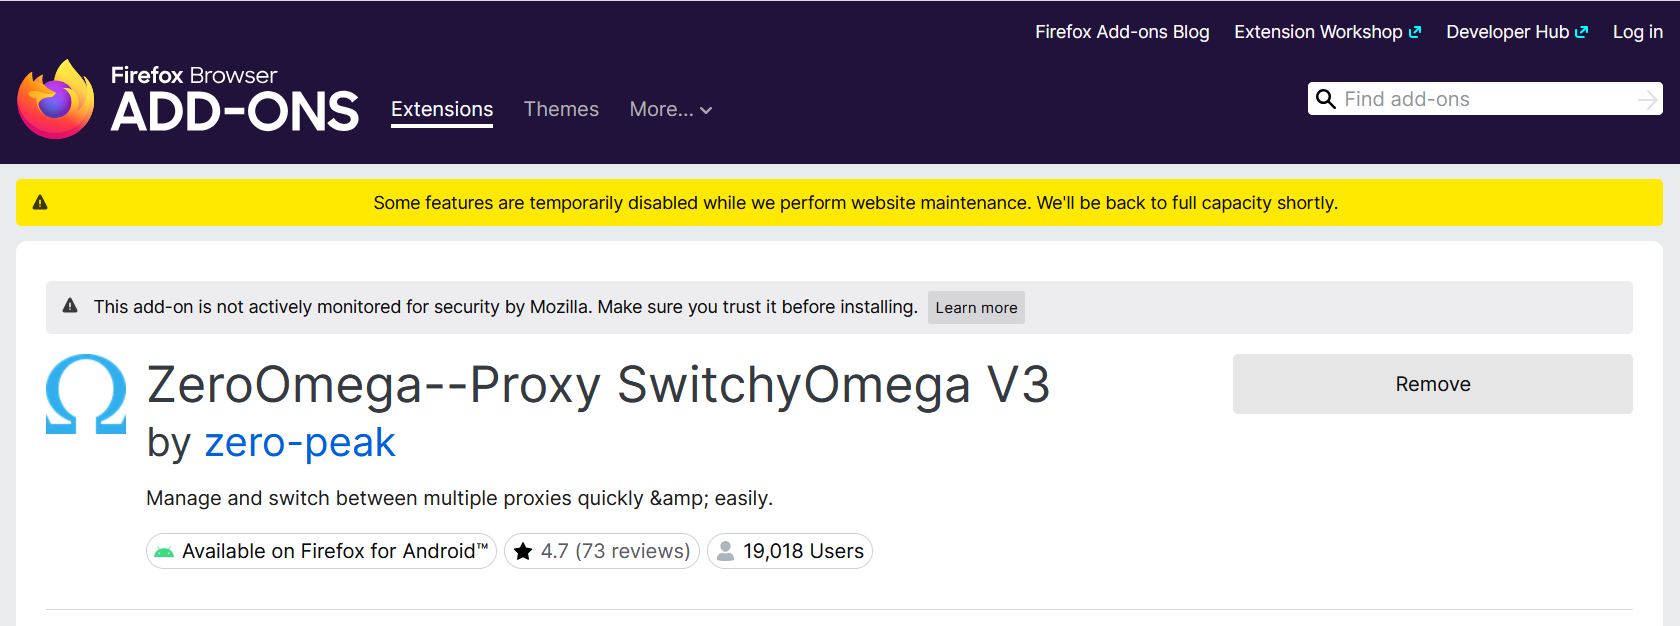
2. Install the proxy extension Zero Omega

ZeroOmega Extension Installation

image1: ZeroOmega Extension Installation

Note: This add-on is maintained by a third-party developer. Make sure you trust the source before installing.

⚙️ Start Configuring Pxyedge IP Proxy

Step 1: Open Extension Settings
  1. Click the Zero Omega icon in the browser toolbar
  2. Click "Options" to enter the settings page

Open Extension Settings

image2: Open Extension Settings

Step 2: Configure Proxy Server
  1. Click "proxy" in the left menu
  2. Select the Protocol (HTTP, HTTPS, SOCKS4, or SOCKS5) — verify your browser supports the required network protocols and choose accordingly
  3. Enter proxy server IP: 128.14.209.70
  4. Enter port number: 3000
  5. Click the "Authentication" button for authentication

Proxy Configuration Interface

image3: Proxy Configuration Interface

Step 3: Authentication
  1. Username format: Your account name -zone-custom
  2. Enter your password

Authentication Interface

image4: Authentication Interface

Important: Please strictly follow the account format requirements in the help documentation to fill in the username. Incorrect format will cause the proxy to not work properly.

Detailed instructions: https://pxyedge.com/documentation/Click-the-Test-Proxy

Step 4: Apply Configuration

Click the "Apply Changes" button to save and apply all configuration changes.

Apply Changes

image5: Apply Changes

🚀 Use the Proxy

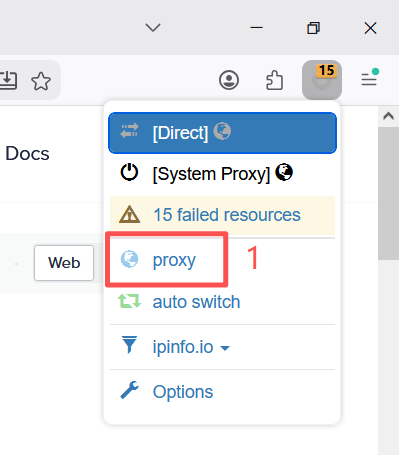
Click the Zero Omega icon, select "proxy" to enable the proxy, select "Direct" for direct connection without proxy.
Enable Proxy

image6: Enable Proxy

✅ Test the Proxy

Visit the following address to verify if the proxy is working:

https://ipinfo.io/what-is-my-ip

IP Test Result

image7: IP Test Result

Verification Successful: If the displayed IP address matches the proxy server IP you configured, the proxy is successfully configured and working properly.


Api Document

Use the API to query traffic usage, manage sessions, create authentication credentials and retrieve proxy endpoint information.

User data usage query

Query account traffic usage through API for reporting or billing integration.

http://128.14.209.70:1030/keep/api/consume/user?account=&password=&dayTime=

Parameter description:

param name required param type description
account No String login account
password No String login password
dayTime Yes(default current_date) String Format(yyyy-MM-dd, e.g. : 2026-01-12)

Request example:

http://128.14.209.70:1030/keep/api/consume/user?account=top0&password=123456&dayTime=2026-01-13

Return example:

{
  "code": 200,
  "data": {
    "balance": 9980.000000,
    "dayTime": "2026-1-13",
    "details": [
      {
        "account": "top0",
        "balance": 19.719692,
        "bytes": 94
      }
    ],
    "total": 94,
    "unit": "M"
  },
  "msg": "SUCCESS"
}

Return parameter description:

param name param type description
Code string The return code, 200 indicates success, while others represent failure
Data String  
balance float  
details   Detailed statistics of traffic usage for each auth account
total   Total data usage
unit   Traffic unit, M represents Mega

Dissociate the client SESSION

Release a session to force a fresh IP allocation on the next request.

http://128.14.209.70:1030/keep/api/session/release?account=&password=&session=

Parameter description:

param name required param type description
account No String login account
password No String login password
session No String Defines a string consisting only of letters and numbers, with a length ranging from 7 to 9 characters.

Request example:

http://128.14.209.70:1030/keep/api/session/release?account=top0&password=123456&session=session001

Return example:

{
  "code": 200,
  "msg": "SUCCESS"
}

Return parameter description:

param name param type description
Code string The return code, 200 indicates success, while others represent failure
msg    

create auth account / whitelist ip

Create proxy authentication credentials or maintain whitelist entries through API.

Parameter description:

param name required param type description
account No String login account
password No String login password
aa No String auth account
ap No String auth password
ip No String whitelist ip

Request example:

http://128.14.209.70:1030/keep/api/create/auth?account=&password=&ip=1.1.1.1

Return example:

{
  "code": 200,
  "msg": "SUCCESS"
}

Return parameter description:

param name param type description
Code string The return code, 200 indicates success, while others represent failure
msg    

Get IP/client information

Query IP and client information for the current proxy account or whitelist entry.

Parameter description:

param name required param type
account No String
password No String
zoneId No country id or region id
limit No get number

Request example:

http://128.14.209.70:1030/keep/api/client/info?account=top0&password=123456&zoneId=120&limit=10

Return example:

{
  "code": 200,
  "count": 10,
  "data": [
    { "clientInfo": "00ug611", "ip": "74.244.23.229" },
    { "clientInfo": "000oips", "ip": "69.110.141.47" },
    { "clientInfo": "00l0vnt", "ip": "73.170.62.71" },
    { "clientInfo": "00nqlii", "ip": "129.222.244.168" },
    { "clientInfo": "000m2co", "ip": "73.72.195.112" },
    { "clientInfo": "001cm1y", "ip": "107.210.29.22" },
    { "clientInfo": "00nw725", "ip": "98.30.162.26" },
    { "clientInfo": "00l351n", "ip": "47.156.73.40" },
    { "clientInfo": "00tpigg", "ip": "216.176.136.97" },
    { "clientInfo": "00ohudd", "ip": "35.151.63.13" }
  ],
  "msg": "SUCCESS"
}

Return parameter description:

param name param type description
Code string The return code, 200 indicates success, while others represent failure
clientInfo String  
Ip String  

Get proxy IP port

Retrieve proxy endpoint information for your current product package.

http://128.14.209.70:1030/keep/api/source?account=&password=&zoneId=&limit=

Parameter description:

param name required param type description
account No String login account
password No String login password
zoneId Yes Int state ID
Limit Yes Int extracted quantity

Request example:

http://128.14.209.70:1030/keep/api/source?account=test&password=test&zoneId=120&limit=10

Return example:

{
  "code": 200,
  "count": 10,
  "data": [
    { "clientIp": "75.176.134.90", "proxyIp": "128.14.209.70", "proxyPort": 10211 },
    { "clientIp": "67.180.175.201", "proxyIp": "128.14.209.70", "proxyPort": 10213 },
    { "clientIp": "71.229.249.121", "proxyIp": "128.14.209.70", "proxyPort": 10214 },
    { "clientIp": "73.90.47.90", "proxyIp": "128.14.209.70", "proxyPort": 10215 },
    { "clientIp": "23.116.212.86", "proxyIp": "128.14.209.70", "proxyPort": 10217 },
    { "clientIp": "98.207.51.70", "proxyIp": "128.14.209.70", "proxyPort": 10218 },
    { "clientIp": "73.211.143.165", "proxyIp": "128.14.209.70", "proxyPort": 10225 },
    { "clientIp": "173.3.131.61", "proxyIp": "128.14.209.70", "proxyPort": 10230 },
    { "clientIp": "47.146.157.16", "proxyIp": "128.14.209.70", "proxyPort": 10231 },
    { "clientIp": "69.140.161.49", "proxyIp": "128.14.209.70", "proxyPort": 10232 }
  ],
  "msg": "SUCCESS"
}

Return parameter description:

param name param type description
Code string The return code, 200 indicates success, while others represent failure
Count string quantity
Data string  
clientIp string client IP
proxyIp string proxy IP
proxyPort string proxyPort

Anti-Detect Browser

BitBrowser and PxyEdge Integration Guide

Ten browser window environment, permanently free of charge, using the Google kernel depth development, can realize physical level simulation of the effect of the real machine information, proxy IP depth anonymization, 100% no connection between the browser window The proxy IP is deeply anonymized, and there is 100% no correlation between the browser windows, which highly guarantees the cleanliness of the browser environment, and it can open more browser windows, log in more accounts, and prevent correlation and blocking.

BitBrowser Website: https://www.bitbrowser.cn/

Before integrating a proxy into BitBrowser, make sure you have set up the proxy correctly to guarantee that the proxy service will work properly.
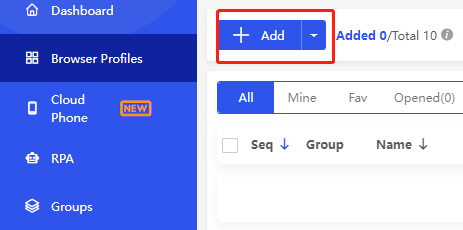
  1. Open the BitBrowser
  2. Click [Add]

BitBrowser add

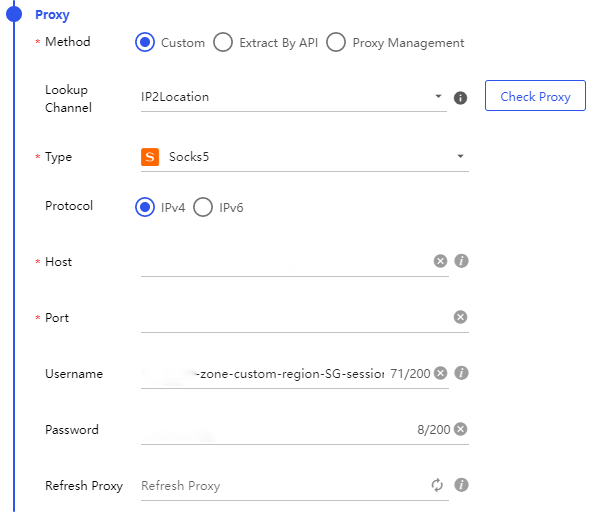
  1. Enter your proxy information according to the input fields. For example, when using the username/password format, go to the proxy settings page on pxyedge, configure the required parameters, and generate your proxy list. Copy the generated proxy string — which corresponds to the proxy host, port, username, and password fields in BitBrowser. You can simply copy the entire proxy string and paste it into the “Host” field. The other values separated by colons will automatically fill in their respective fields.

BitBrowser proxy config

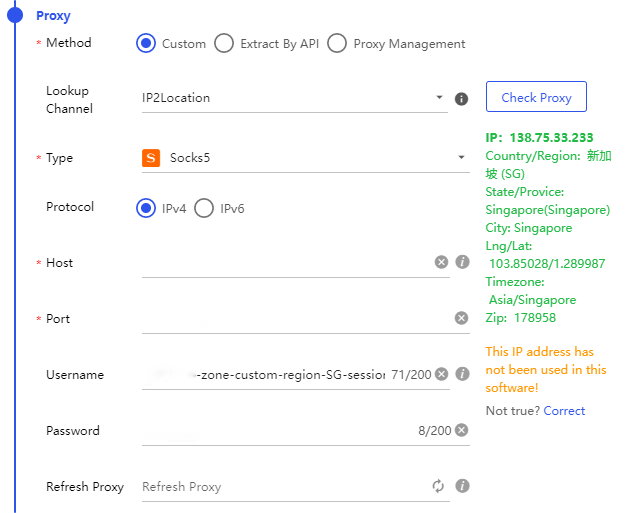
  1. Click the “Check Proxy” button. If the information appears in green as shown, it means the proxy has been set up successfully. Then, simply save the configuration in this window.

BitBrowser check proxy

After completing the above steps, you can now use PxyEdge's proxies to access web pages in BitBrowser.

If you have any questions or suggestions during use, please feel free to contact us. We are glad to hear your thoughts and provide assistance!

AdsPower and PxyEdge Integration Guide

AdsPower Official Website Registration:https://www.adspower.net

Before integrating the proxy into AdsPower, ensure your proxy is correctly set up to guarantee normal service operation.

For proxy configuration, please refer to: 【Help Documentation】

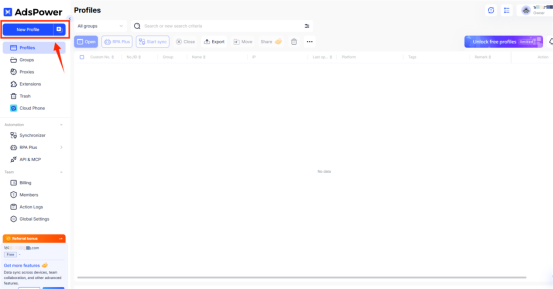
  1. Open AdsPower and create a new browser profile.

AdsPower new profile

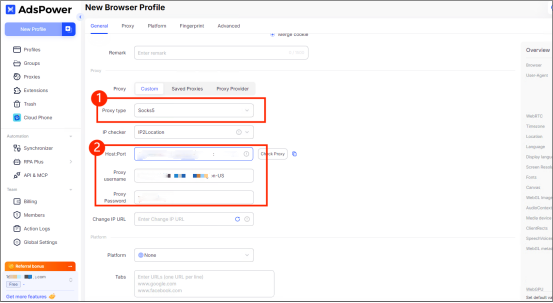
  1. This time, we will use the username/password extraction method as an example. In AdsPower, select the appropriate proxy type, such as HTTP/SOCKS5 protocol, and enter the username, password, proxy host, and proxy port information copied from pxyedge.

AdsPower proxy config

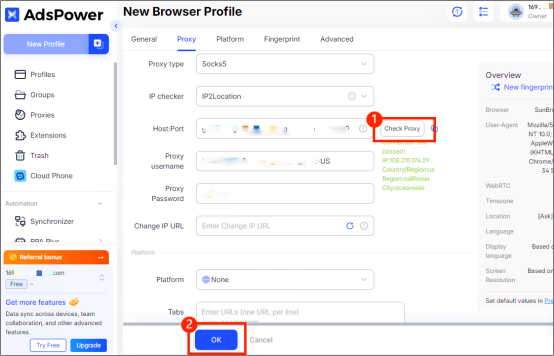
  1. Click【Check Proxy】, then【OK】 upon success.

AdsPower check proxy

Now you can use pxyedge's proxies through AdsPower.

If you encounter any issues or have suggestions during use, please feel free to contact us. We are happy to hear your thoughts and provide assistance!

Incogniton and PxyEdge Integration Guide

Incogniton is an anti-detect browser designed for secure multi-account management, offering proxy integration, team collaboration, and tools to safely run campaigns with minimal risk and maximum efficiency.

Official website: https://incogniton.com

Before integrating your proxy into Incogniton, please make sure your proxy has been properly configured to ensure that the service runs normally.

  1. Open Incogniton
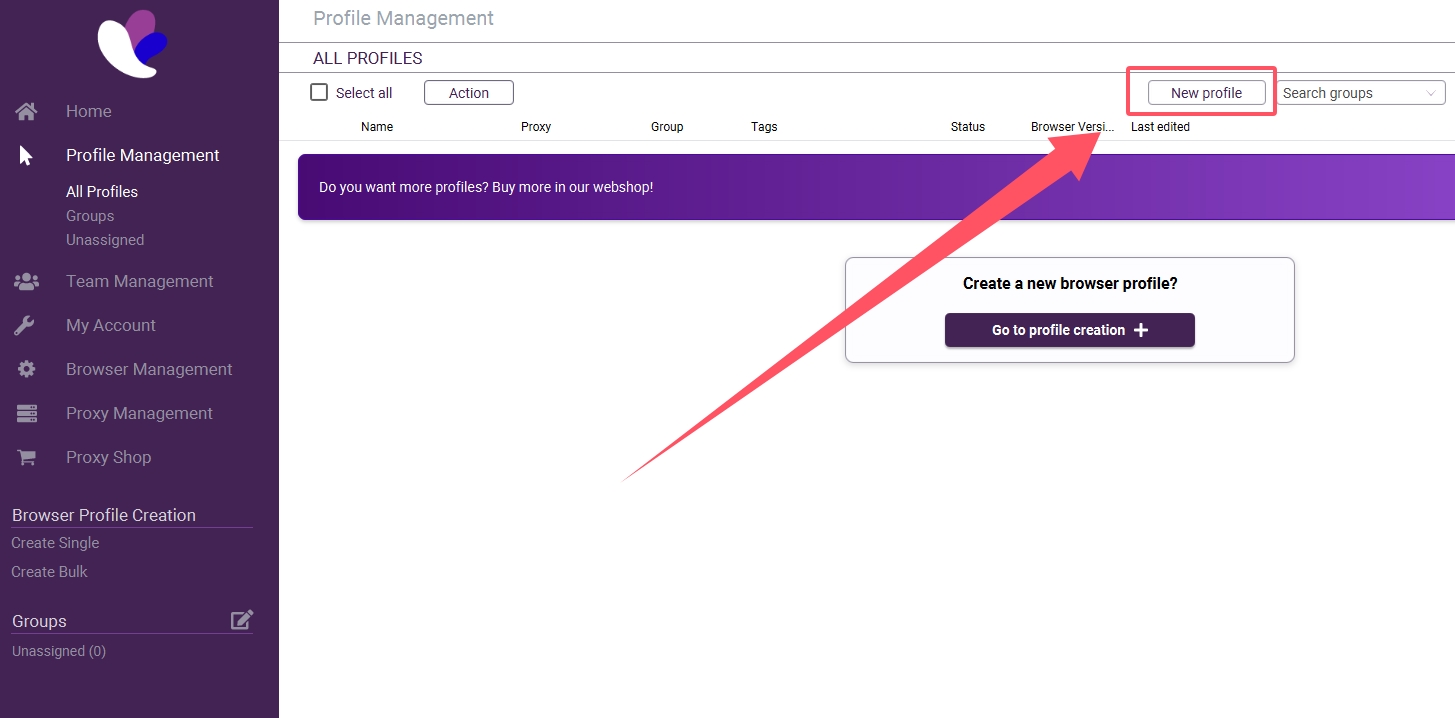
  2. Click “New profile”

Incogniton new profile

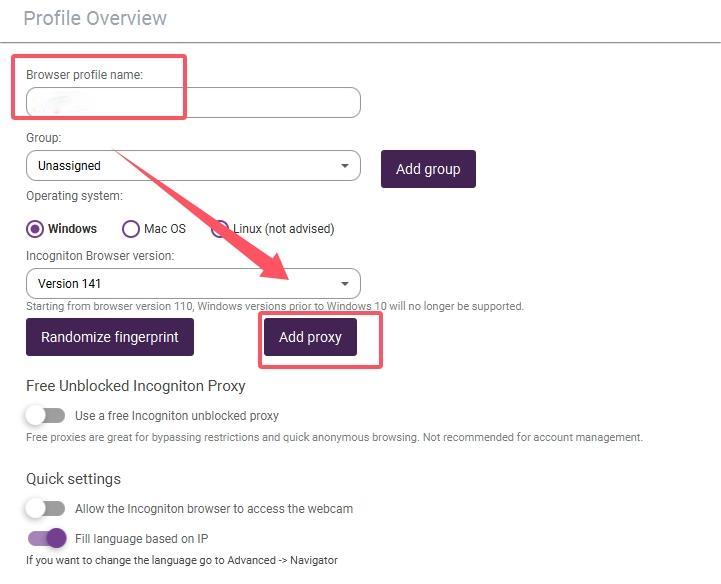
  1. Enter a browser profile name, then click “Add Proxy”

Incogniton add proxy

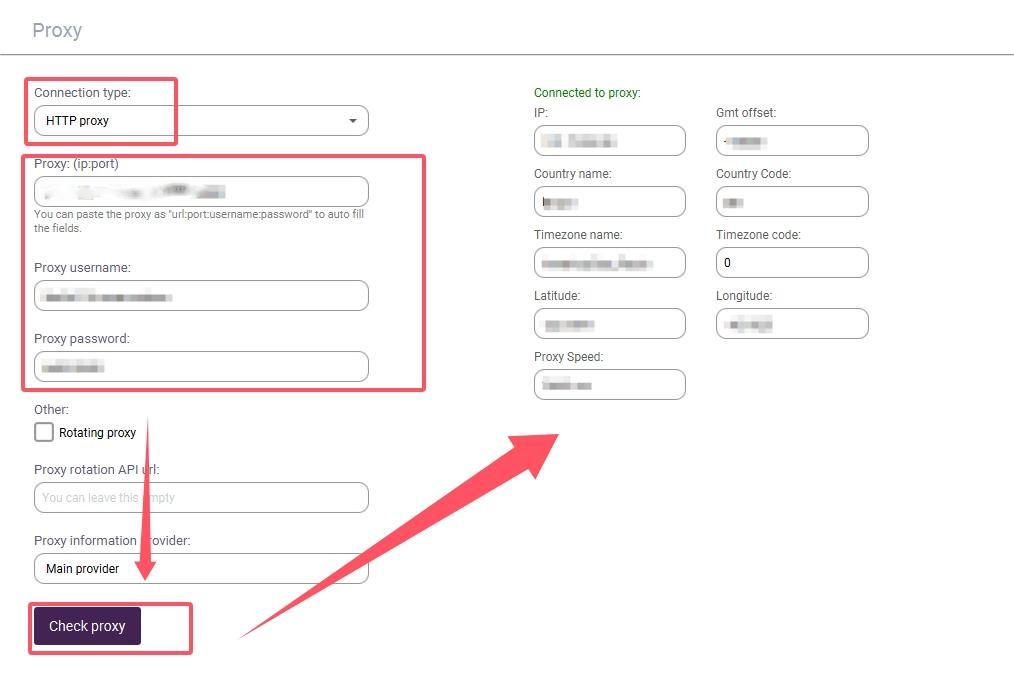
  1. Select your connection type as HTTP Proxy or SOCKS5 Proxy, and enter your proxy details according to the input fields. Using the username/password authentication as an example: Go to the proxy settings page on pxyedge, configure the required parameters, and generate your proxy list.The default format is hostname:port:username:password . Fill these values into Incogniton's IP, Port, Proxy Username, and Proxy Password fields accordingly. Click the “Check Proxy” button. If a green success message appears as shown, it means the proxy has been set successfully.

Incogniton check proxy

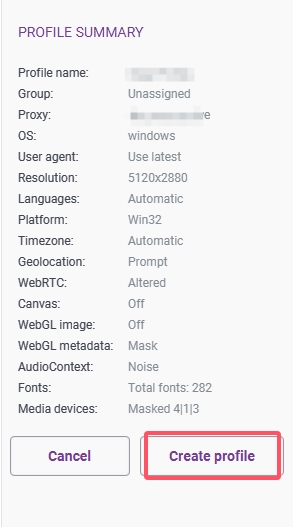
  1. After completing the setup, click Create profile on the right panel. Save the configuration, then open it to start using it.

Incogniton create profile

After completing the above steps, you can now use PxyEdge to access web pages in Incogniton.

If you have any questions or suggestions during use, please feel free to contact us. We are glad to hear your thoughts and provide assistance!

Hubstudio and PxyEdge Integration Guide

Before integrating a proxy into Hubstudio, make sure you have set up the proxy correctly to guarantee that the proxy service will work properly.
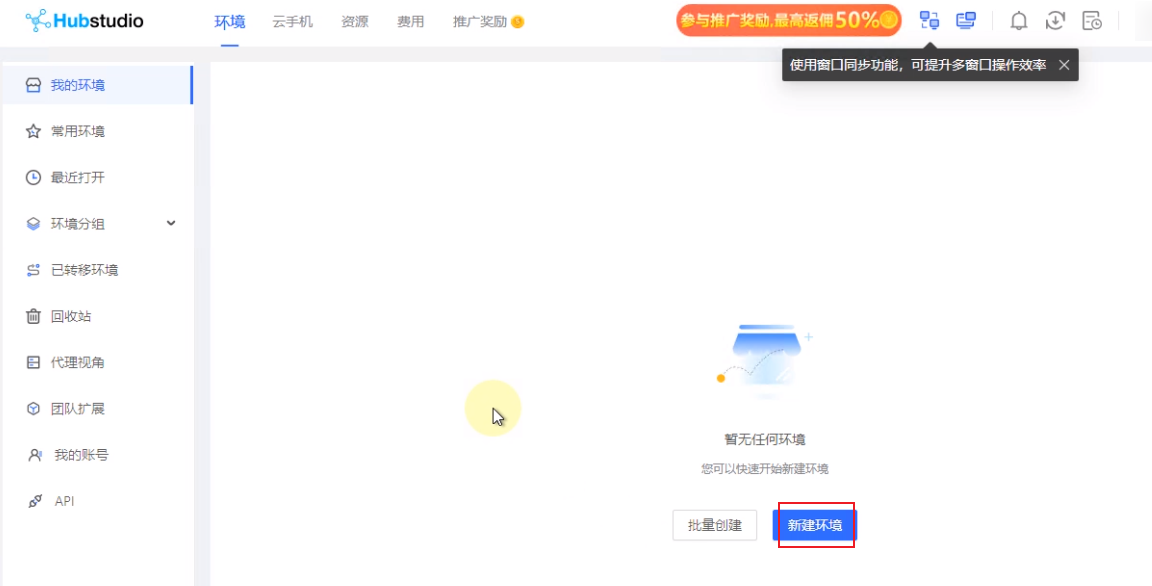
  1. Open Hubstudio and click New Profile

Hubstudio new profile

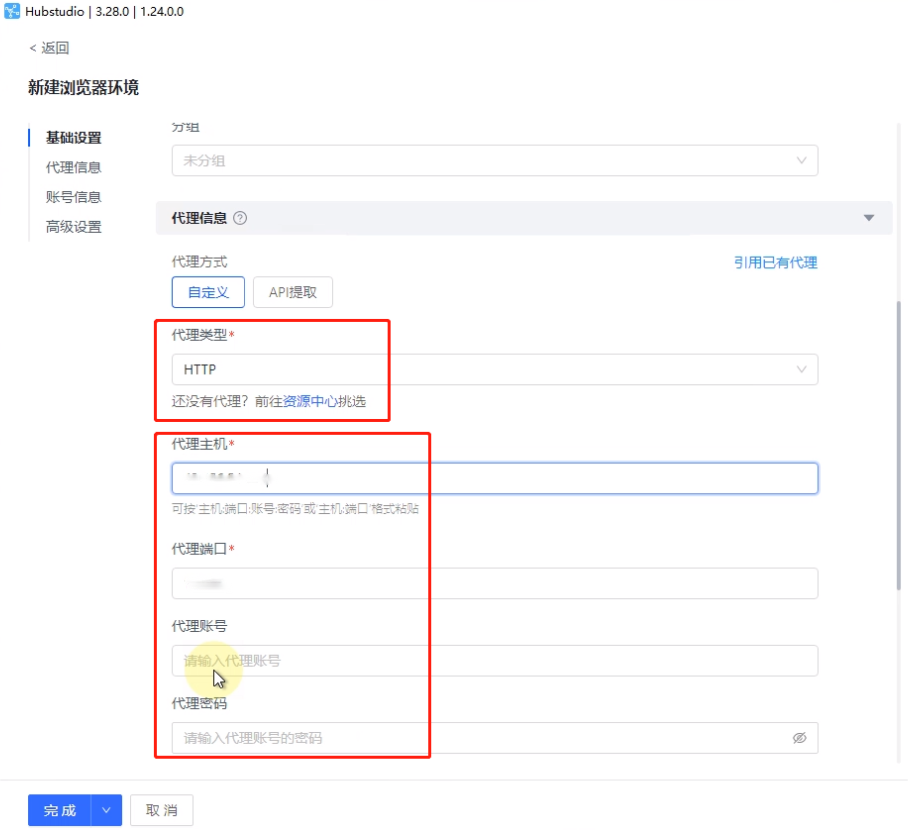
  1. Select the proxy type, take the API access as an example, enter the host and port copied from PxyEdge, and fill in the proxy account and proxy password if you choose the Username: Password Authentication method

Hubstudio proxy config

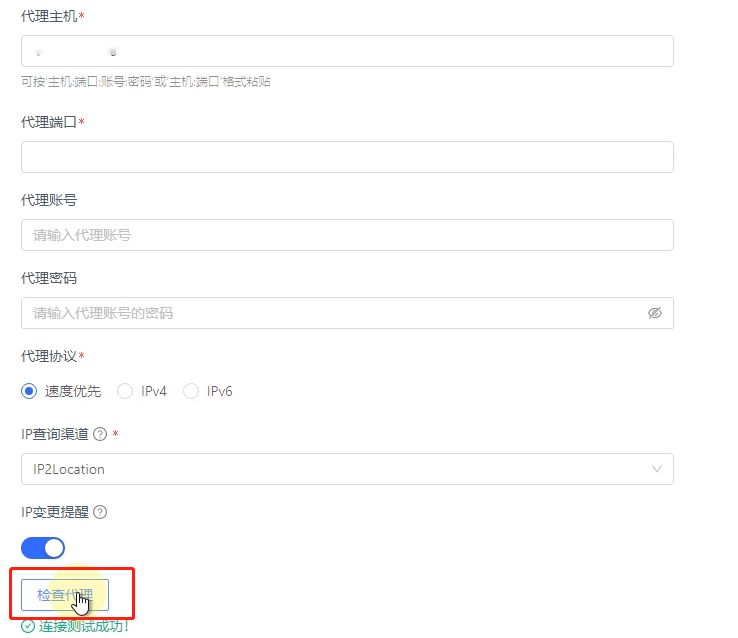
  1. Finally, click Check Proxy, after successful detection, click Finish to start using it

Hubstudio check proxy

You are now ready to configuring Hubstudio through the PxyEdge website.

If you have any questions or suggestions during use, please feel free to contact us. We are glad to hear your thoughts and provide assistance!

MuLogin and PxyEdge Integration Guide

Before integrating a proxy into MuLogin, make sure you have set up the proxy correctly to guarantee that the proxy service will work properly.
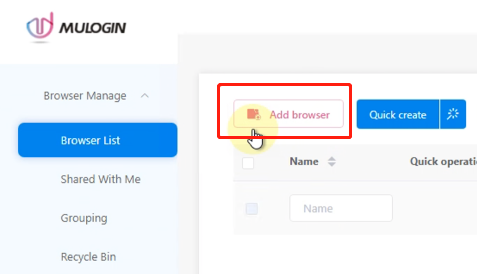
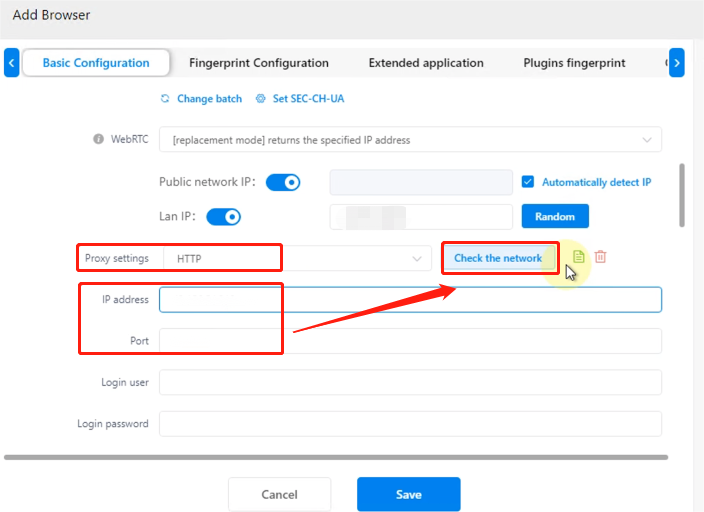
  1. Open MuLogin Browser and click Add browser

MuLogin add browser

  1. Enter the name, select the proxy type in the proxy settings, take the API access as an example, enter the host and port copied from PxyEdge, and fill in the login username and password if you choose the Username: Password Authentication method, then click Check the network

MuLogin proxy config

  1. After successful checking, click Save to start using it

You are now ready to configuring MuLogin through the PxyEdge website.

If you have any questions or suggestions during use, please feel free to contact us. We are glad to hear your thoughts and provide assistance!

Xlogin and PxyEdge Integration Guide

Before integrating a proxy into XLogin, make sure you have set up the proxy correctly to guarantee that the proxy service will work properly.
  1. Open XLogin Browser, click [New Browser Profile]
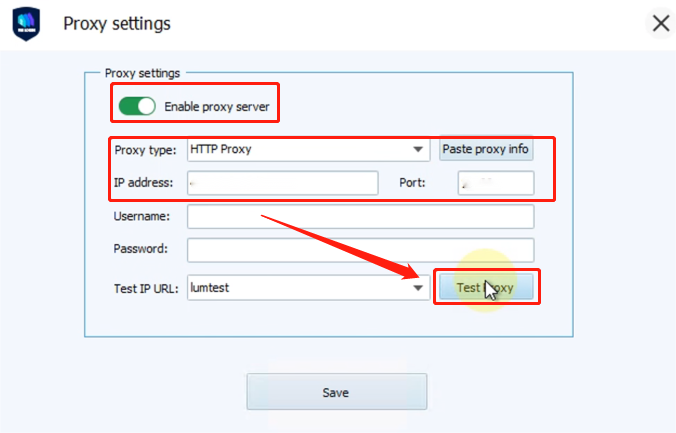
  2. In the [Setting proxy server] window, turn on [Enable proxy server], select the proxy type, take the API access as an example, enter the host and port copied from PxyEdge. If you have selected the Username: Password Authentication method, you also need to fill in the username and password

Xlogin proxy config

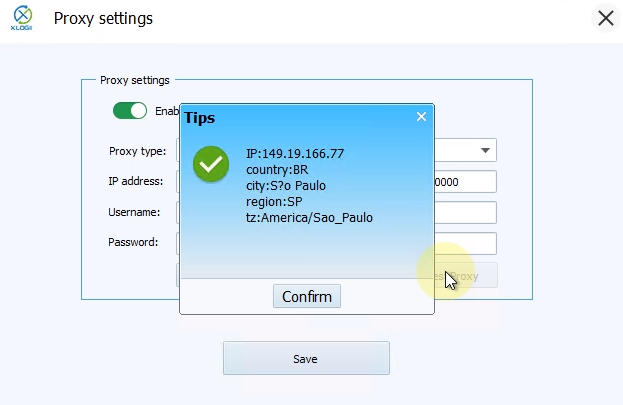
  1. Click [Test Proxy], and click [Save] after success

Xlogin test proxy

You are now ready to configuring XLogin through the PxyEdge website.

If you have any questions or suggestions during use, please feel free to contact us. We are glad to hear your thoughts and provide assistance!

Yunlark and PxyEdge Integration Guide

Before integrating a proxy into YunLark, make sure you have set up the proxy correctly to guarantee that the proxy service will work properly.
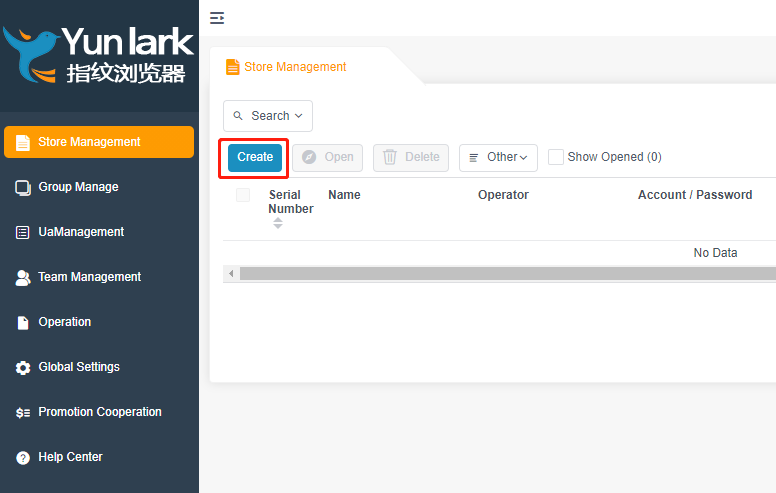
  1. Open YunLark and click [Create] in [Store Management] section.

Yunlark create

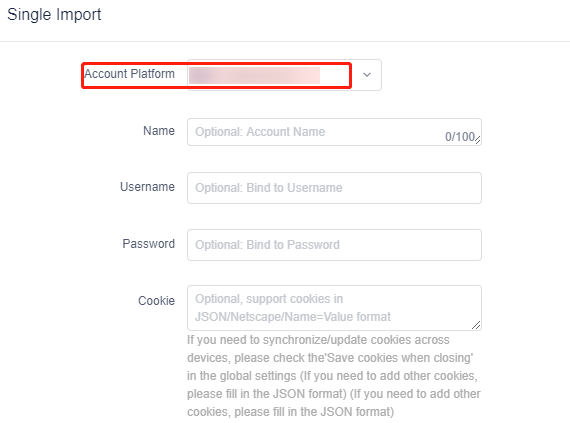
  1. Select [Account Platform], all other fields are optional.

Yunlark account platform

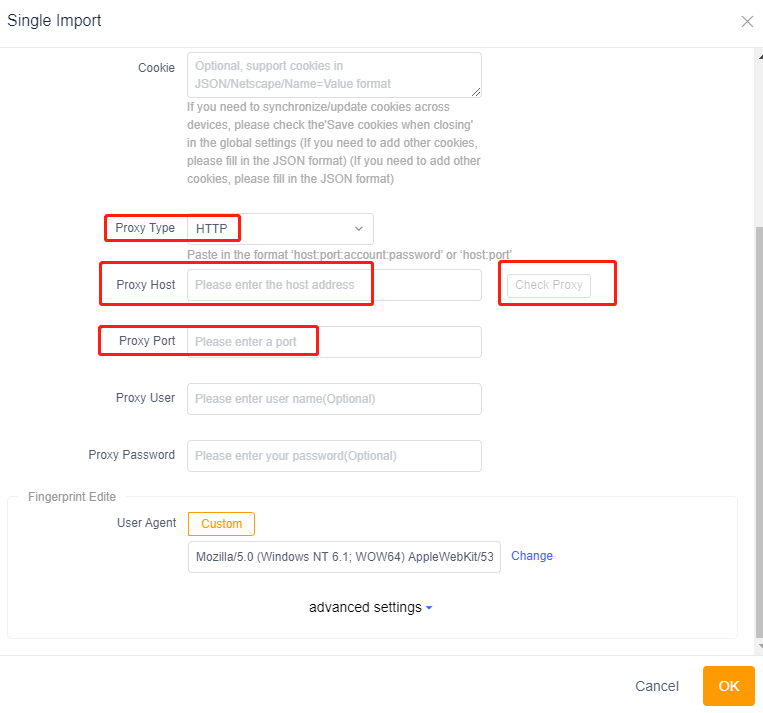
  1. Select the [Proxy Type] you want to use. Take the API access as an example, fill in the 'Proxy Host' and 'Proxy Port', if you use username: password authentication, you still need to fill in 'Proxy User' and 'Proxy Password', and then click [Check Proxy], shows that the connection test is successful you can click [OK]!

Yunlark proxy config

You are now ready to configuring YunLark through the PxyEdge website.

If you have any questions or suggestions during use, please feel free to contact us. We are glad to hear your thoughts and provide assistance!

VMLogin and PxyEdge Integration Guide

Before integrating a proxy into VMLogin, make sure you have set up the proxy correctly to guarantee that the proxy service will work properly.
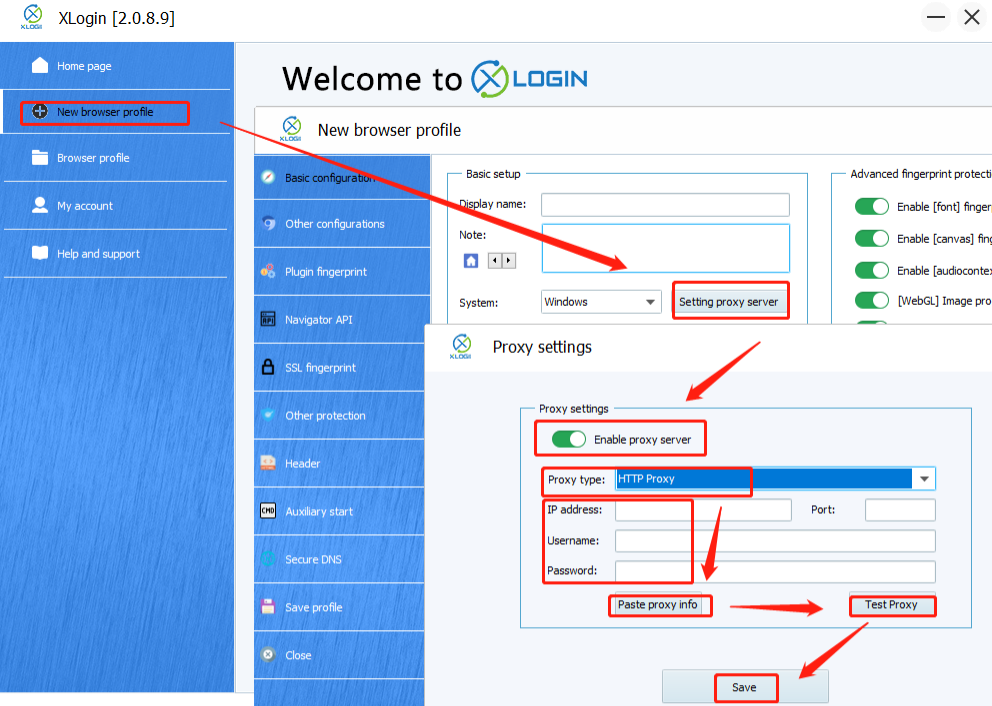
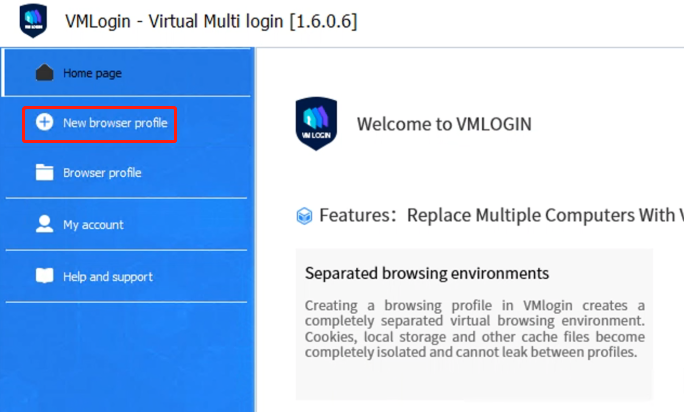
  1. Open the VMLogin browser and click New browser profile

VMLogin new profile

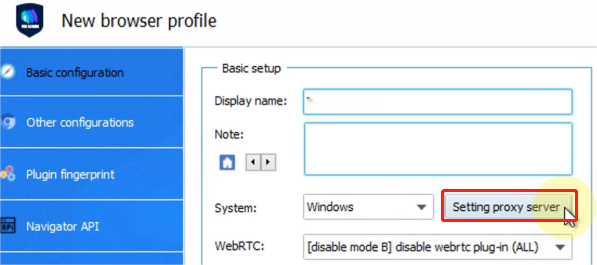
  1. Click “Setting proxy server”

VMLogin setting proxy

  1. Open the Proxy Server button, select Proxy type, take the API access as an example, enter the host and port copied from PxyEdge, for Username: Password Authentication Mode, you still need to fill in the username and password. Finally click Test Proxy, after successful detection, save it to start using it

VMLogin test proxy

You are now ready to configuring VMLogin through the PxyEdge website.

If you have any questions or suggestions during use, please feel free to contact us. We are glad to hear your thoughts and provide assistance!

Browsers & Extensions

Chrome

Before integrating proxies into Chrome, make sure you have set up the proxy correctly to guarantee that the proxy service will work properly.
  1. Install a proxy extension on your browser, such as SwitchyOmega, or choose your usual extension, search for it in the Google Play Store and add it.
  2. Download the Chrome extension, unzip it and locate the extension folder.
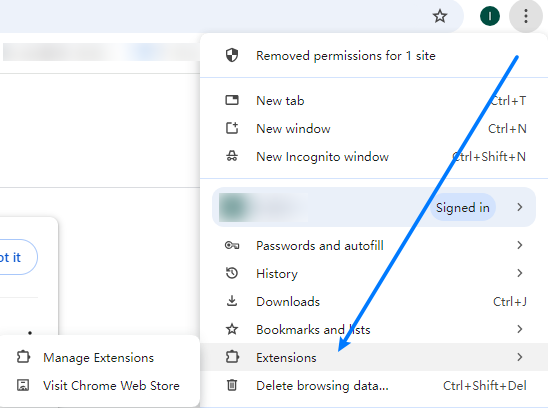
  3. Click the three dots to the right of the Chrome address bar, select Extensions, and then click "Manage Extensions" in the extended menu bar.

Chrome manage extensions

  1. In the page that opens, activate the "Developer Mode" button and drag the unzipped extension folder directly to the page.
  2. After the installation is complete, click the extension icon on the right side of the Chrome address bar to open the installed proxy extension.

Chrome extension icon

  1. In the proxy extension, add proxy settings such as proxy protocol, proxy server, proxy port, username, password, etc. and save your changes.
  2. Detect your IP through the browser, the current IP address and proxy IP is the same, it means that the proxy setup is successful.

Through the above steps, you have successfully completed the integration of Chrome and proxy, providing a more secure and flexible option for network connection.

Firefox

Before integrating a proxy into Firefox, please make sure you have set up the proxy correctly to guarantee that the proxy service will work properly.
  1. Open Firefox.
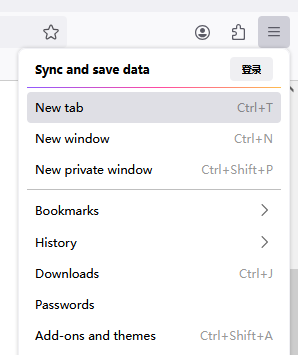
  2. Click the Applications icon on the right side of the address bar and select Add-ons and themes from the drop-down menu.

Firefox add-ons

  1. Search for proxy extensions, such as SwitchyOmega, in the Add-ons Manager, or choose your usual extensions to add to Firefox.
  2. After the installation is complete, click the extension icon on the right side of the Firefox address bar to open the installed proxy extension.

Firefox extension

  1. Add proxy setting information such as proxy protocol, proxy server, proxy port, username, password, etc. in the Proxy extension, and then save your changes.
  2. Detect your IP through the browser, the current IP address and proxy IP is the same, it means that the proxy setup is successful.

Through the above steps, you have successfully completed the integration of Firefox and proxy, which provides a more secure and flexible option for network connection.

Safari

Before integrating a proxy into Safari, make sure you have set up the proxy correctly to guarantee that the proxy service will work properly.
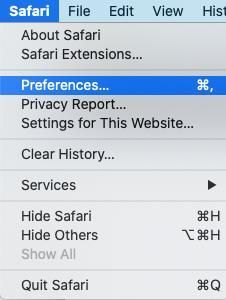
  1. Open Safari and select "Preferences" from the menu.

Safari preferences

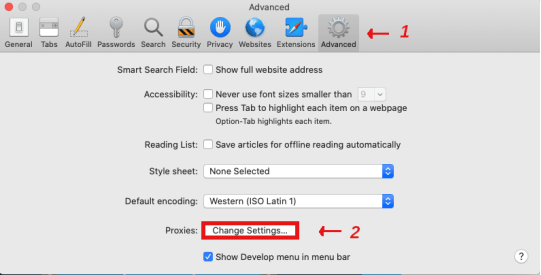
  1. Click the "Advanced" button on the right side of the menu bar, then at the bottom of the page, click "Change Settings" next to Proxies.

Safari advanced

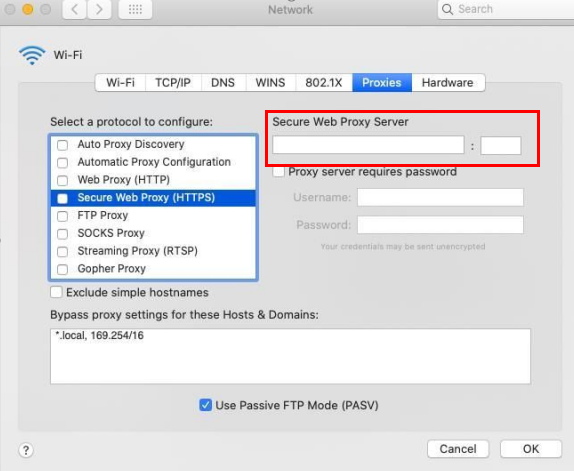
  1. After entering the Proxy Settings page, enter the proxy details provided by the administrator or proxy service, such as server, port, username, password, and so on. Generally, you will use HTTP or HTTPS protocol, as shown in the following figure, but the specific settings depend on your proxy details.

Safari proxy settings

  1. Enter the required information for the proxy and click "OK" to save the changes.

With the above steps, you have successfully completed the integration of Safari and proxy, which provides a more secure and flexible option for Internet connection.

BP Proxy Switcher

Before integrating a proxy into BP Proxy Switcher, make sure you have set up the proxy correctly to guarantee that the proxy service will work properly.
Tips: Before using the plug-in, add the local IP address to the IP whitelist

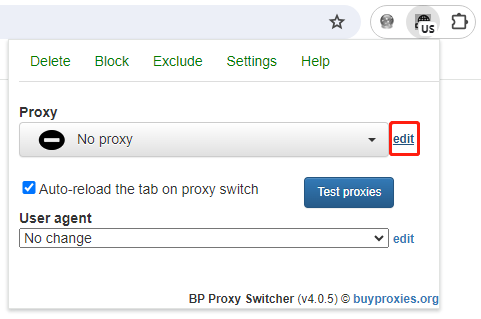
  1. Click the BP Proxy Switcher icon and click edit

BP Proxy Switcher edit

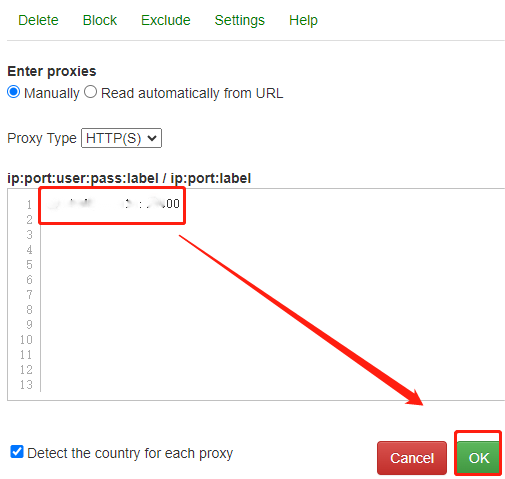
  1. Select HTTP(S) as the proxy type, enter the ip:port extracted through the API, and click OK

BP Proxy Switcher config

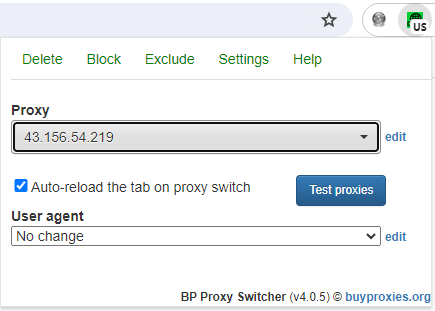
  1. The icon of BP Proxy Switcher turns on, indicating that the proxy is successfully configured. If the icon does not light up, reconfiguration is required.

BP Proxy Switcher active

Through the above steps, you have successfully completed the integration of BP Proxy Switcher and proxy, which provides a more secure and flexible option for network connection.

Proxy Helper

Before integrating a proxy into Proxy Helper, make sure you have set up the proxy correctly to guarantee that the proxy service will work properly.
Tips: Before using the plug-in, add the local IP address to the IP whitelist

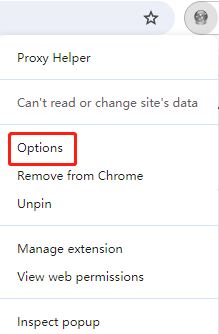
  1. Right-click the Proxy Helper icon and click Options

Proxy Helper options

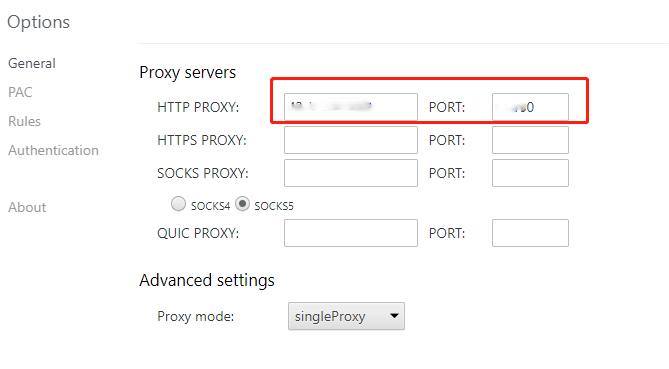
  1. Fill in the HTTP proxy with the host and port extracted through the API

Proxy Helper config

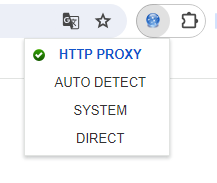
  1. Click the Proxy Helper icon and select the HTTP proxy

Proxy Helper select

  1. Proxy Helper icon turns on, proxy configuration is successful. If the icon does not light up, reconfiguration is required.

Through the above steps, you have successfully completed the integration of Proxy Helper and proxy, which provides a more secure and flexible option for network connection.

IPBurger Proxy & VPN

Before integrating a proxy into IPBurger Proxy & VPN, make sure you have set up the proxy correctly to guarantee that the proxy service will work properly. Click here to see how to set up the proxy.

Tips: Before using the plug-in, add the local IP address to the IP whitelist

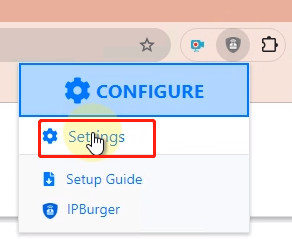
  1. Click the IPBurger Proxy & VPN icon and click Settings

IPBurger settings

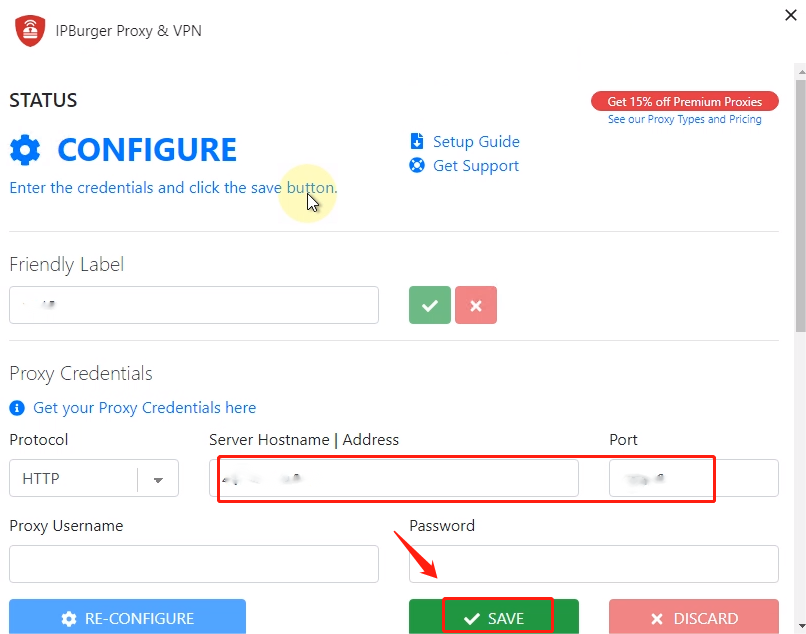
  1. Select HTTP as the proxy protocol, enter the hostname and port extracted through the API, and click SAVE

IPBurger config

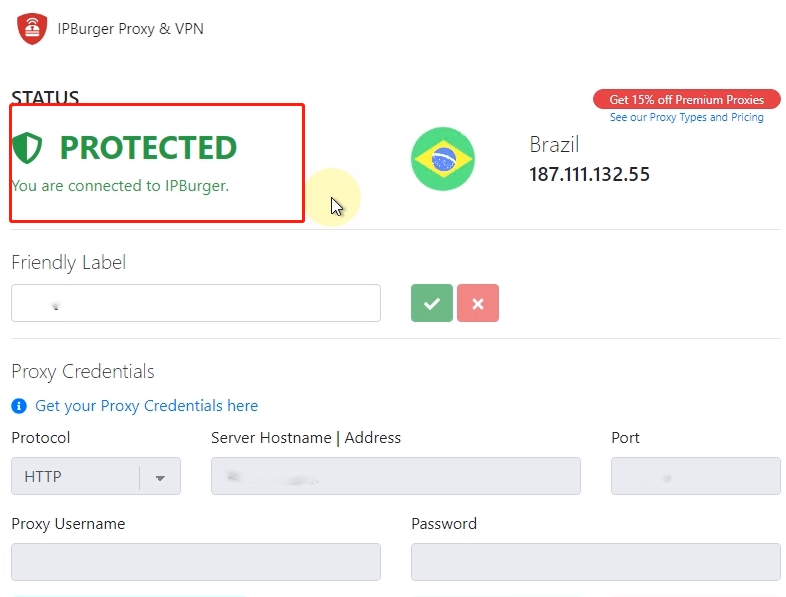
  1. After saving, the proxy will be detected automatically, and the current IP location will be displayed after successful detection

IPBurger detected

  1. IPBurger Proxy & VPN icon turns on, proxy configuration is successful. If the icon does not light up, reconfigure or set to turn on

Through the above steps, you have successfully completed the integration of IPBurger Proxy & VPN and proxy, which provides a more secure and flexible option for network connection.

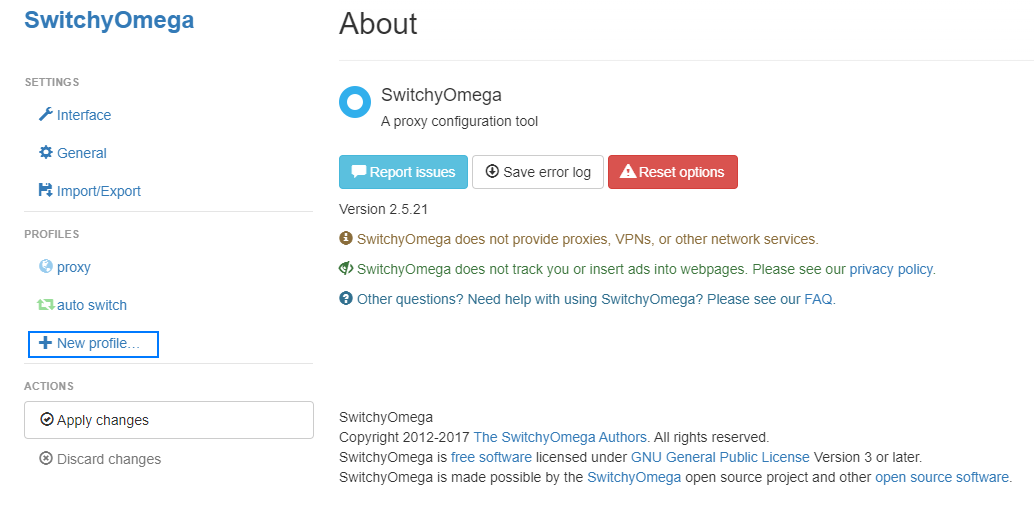
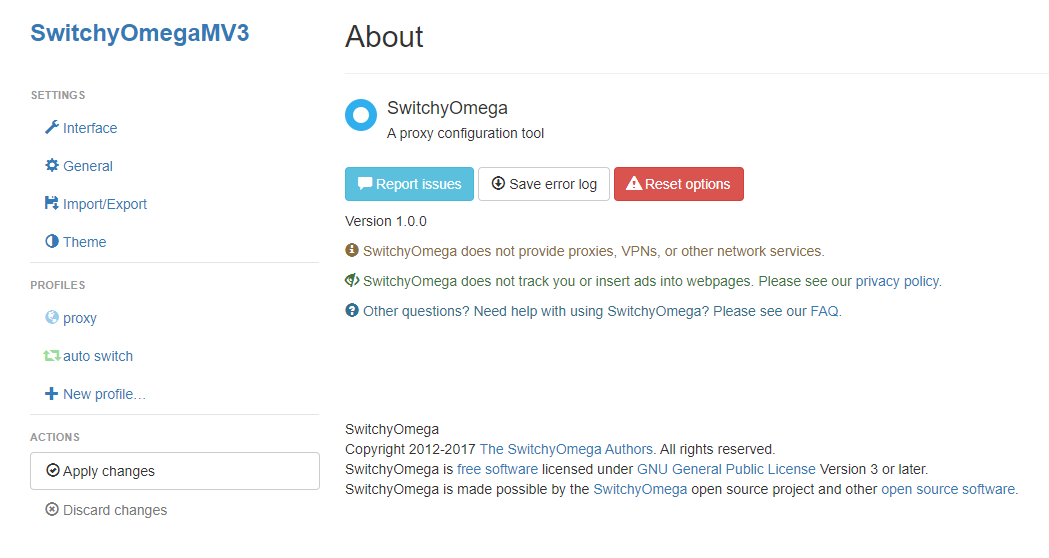
SwitchyOmega

Before integrating a proxy into SwitchyOmega, make sure you have set up the proxy correctly to guarantee that the proxy service will work properly.
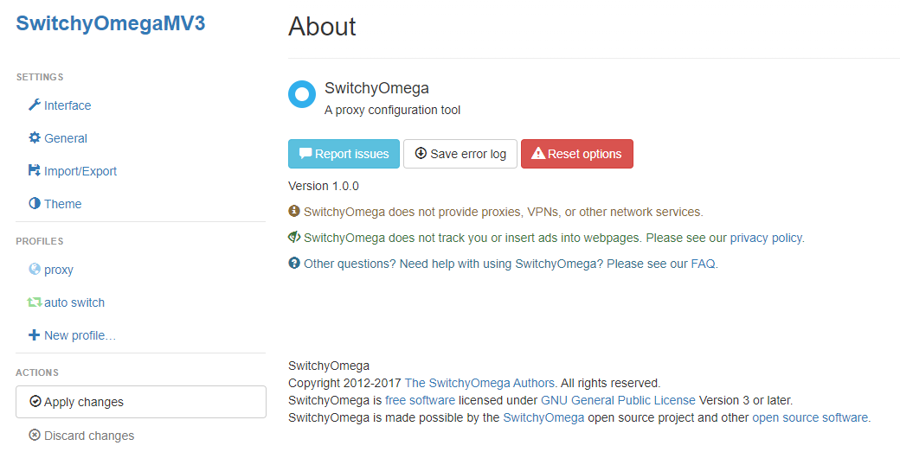
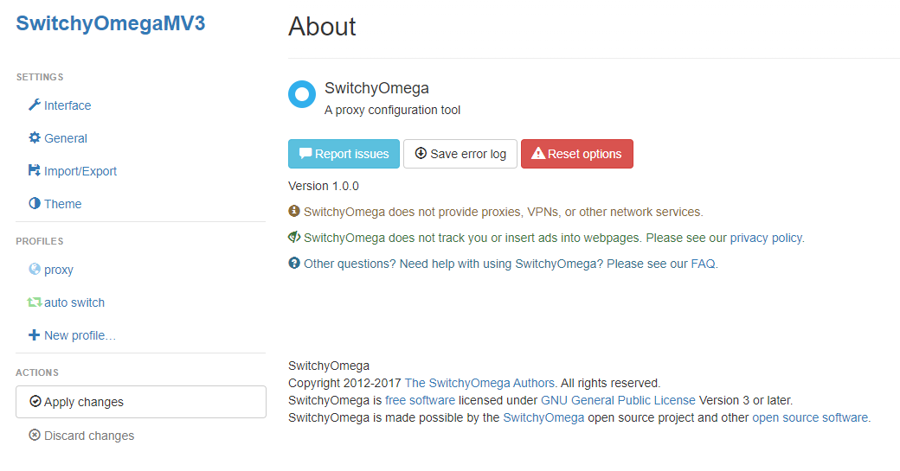
  1. Open the SwitchyOmega Options via the browser extension.
  2. Click "New profile".

SwitchyOmega new profile

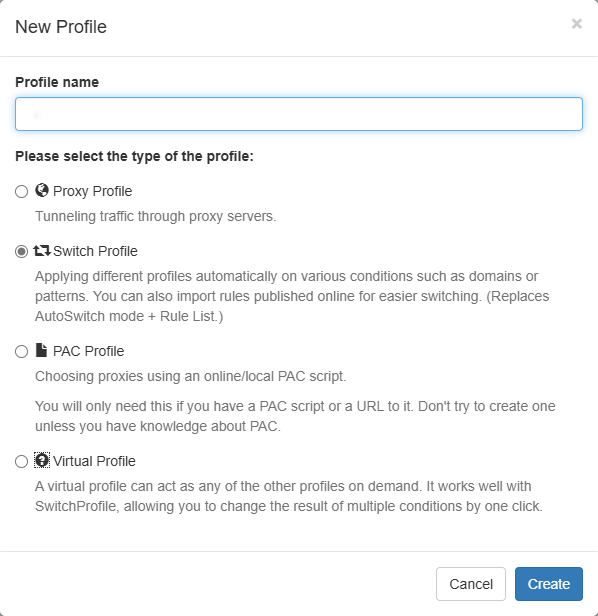
  1. In the pop-up window, enter the profile name, select the profile type and click Create.

SwitchyOmega create

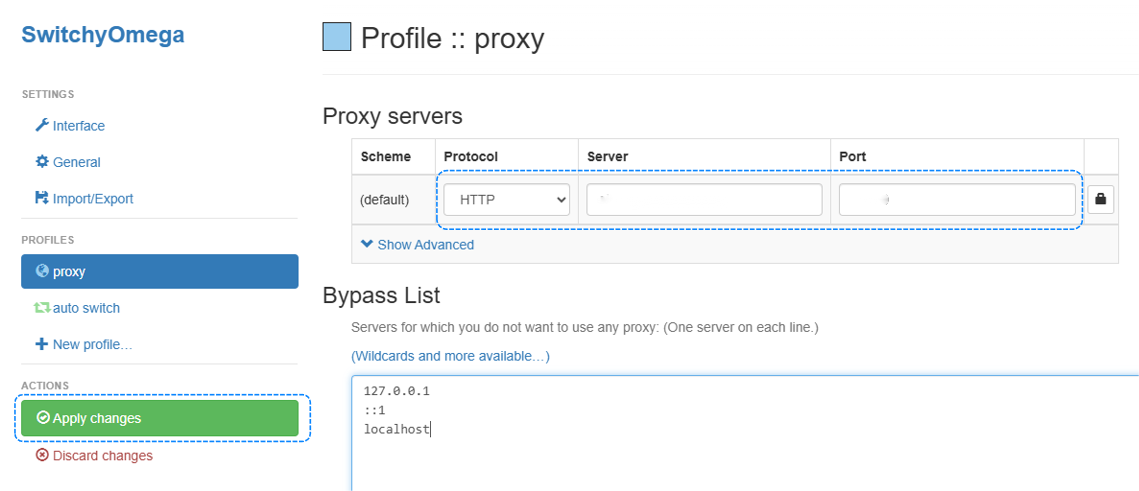
  1. In the created profile, select the type of proxy protocol that corresponds to the proxy settings and enter the proxy host and port provided by the PxyEdge.

SwitchyOmega config

  1. Click the green 'Apply changes' button on the left side to complete the configuration.
  2. Connect to the proxy:
  • If you get the proxy via API (IP whitelist), simply select the proxy you configured in the SwitchyOmega extension in the browser's address bar and connect.
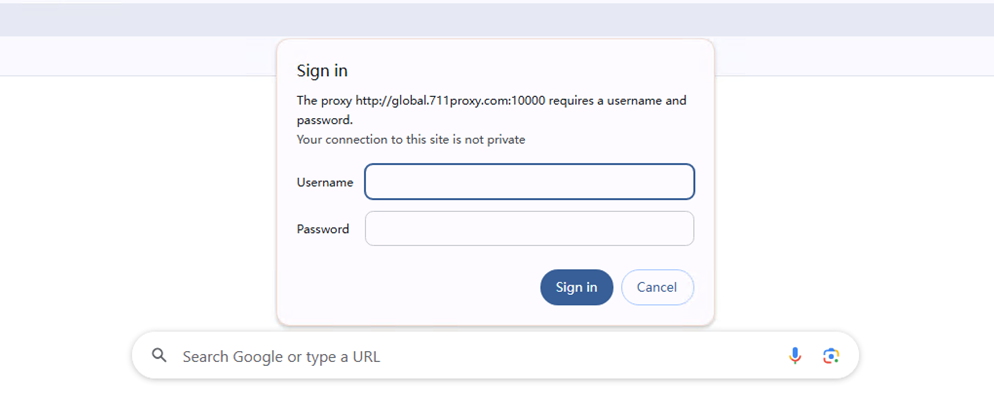
  • If you get the proxy via username/password, make sure that the IP address you wish to access the proxy service from has been removed from the whitelist. Then, in the SwitchyOmega extension in the browser's address bar, select the proxy you configured, enter your proxy username and password in the popup window, and click Sign in.

SwitchyOmega auth

  1. Check your IP through the browser, the current IP address and the proxy IP are the same, then it means the proxy setup is successful.

Through the above steps, you have successfully completed the integration of SwitchyOmega and proxy, providing a more secure and flexible option for network connection.

Microsoft Edge

Before integrating a proxy into Edge, make sure you have set up the proxy correctly to guarantee that the proxy service will work properly.
  1. Launch Microsoft Edge.
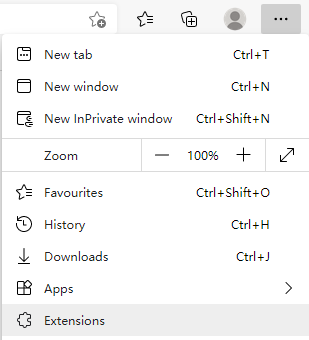
  2. Open Edge and click the three-dot icon on the right side of the address bar.
  3. Click "Extensions" in the drop-down menu list.

Edge extensions

  1. Click Get extensions for Microsoft Edge to enter the Extension homepage.
  2. Search for proxy extensions, such as SwitchyOmega, or other commonly used extensions, and add them to Edge.
  3. After the installation is complete, click the extension icon on the right side of Edge address bar to open the installed proxy extension.

Edge extension

  1. Add proxy settings in the proxy extension, such as proxy protocol, proxy server, proxy port, username, password and other information, and then save your changes.
  2. Check your IP through browser, the current IP address and the proxy IP are the same, it means the proxy setup is successful.

Through the above steps, you have successfully completed the integration of Edge and proxy, providing a more secure and flexible option for network connection.

Operating Systems

Windows 10

Before integrating the proxy into Windows 10, make sure you have set up the proxy correctly to guarantee that the proxy service will work properly.
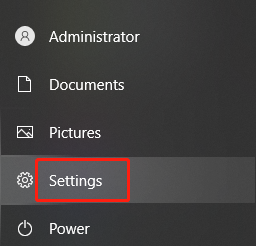
  1. Click the Start icon and select "Settings" from the menu.

Windows settings

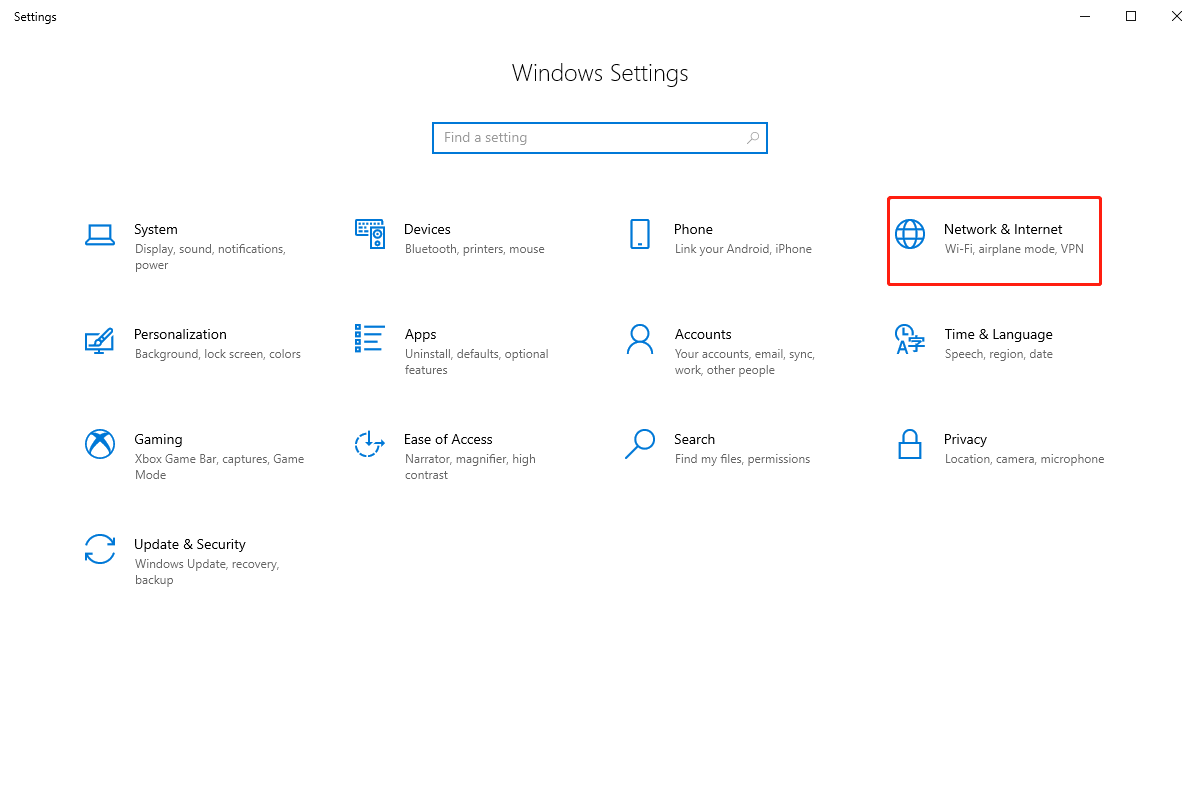
  1. On the Settings page, click "Network & Internet".

Windows network

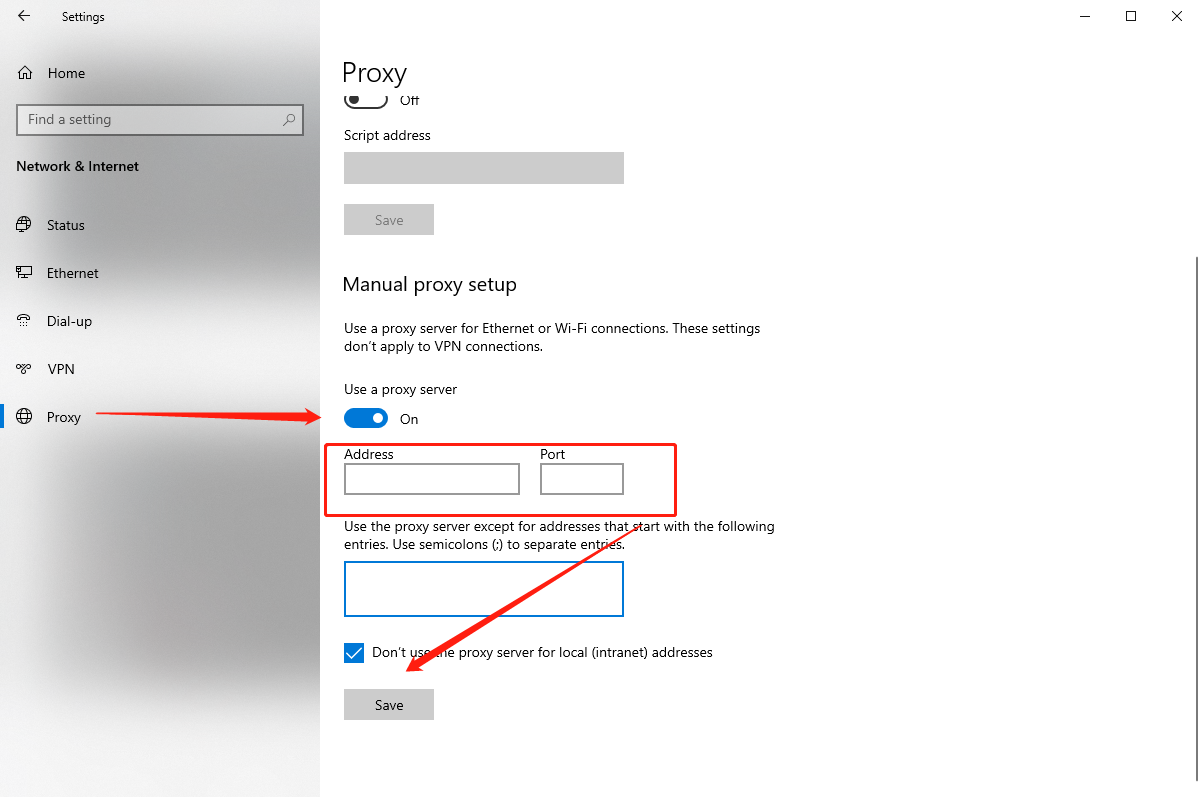
  1. Go to the "Network & Internet" page, click "Proxy" on the left side, and then on the corresponding page, activate the "Use a proxy server" button, enter the Address and Port, and click "Save" to save the changes.

Windows proxy

  1. Detect your IP through the browser, the current IP address and proxy IP is the same, it means that the proxy setup is successful.

Through the above steps, you have successfully completed the integration of Windows 10 and proxy, providing a more secure and flexible option for network connection.

Mac

Before integrating the proxy into your Mac, make sure you have set up the proxy correctly to guarantee that the proxy service will work properly.
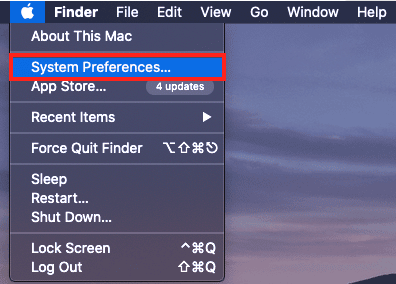
  1. Click on the logo icon in the upper left corner and select "System Preferences" from the menu.

Mac system preferences

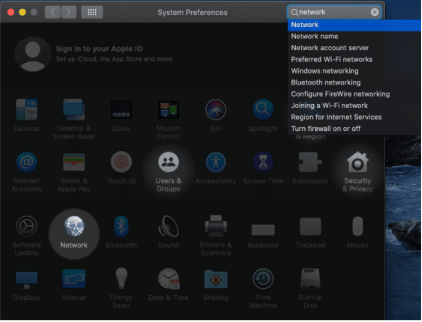
  1. Click "Network" settings.

Mac network

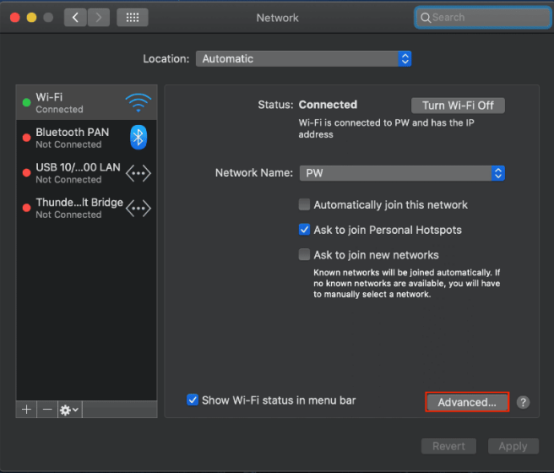
  1. Click the "Advanced" button at the bottom right corner of the window.

Mac advanced

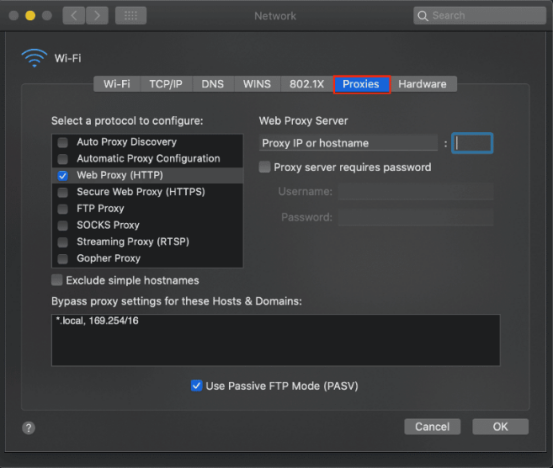
  1. After entering the Advanced page, click the "Proxies" tab in the menu bar, and in the corresponding page, select the protocol type and enter the proxy details provided by the administrator or the proxy service, such as server, port, username, password, etc.

Mac proxies

  1. Enter the required information for the proxy and click "OK" to save the changes.
  2. Detect your IP through the browser, the current IP address and the proxy IP is the same, it means that the proxy setup is successful.

Through the above steps, you have successfully completed the integration of Mac and proxy, providing a more secure and flexible option for network connection.

Android

Before integrating a proxy into Android, make sure you have set up the proxy correctly to guarantee that the proxy service will work properly.
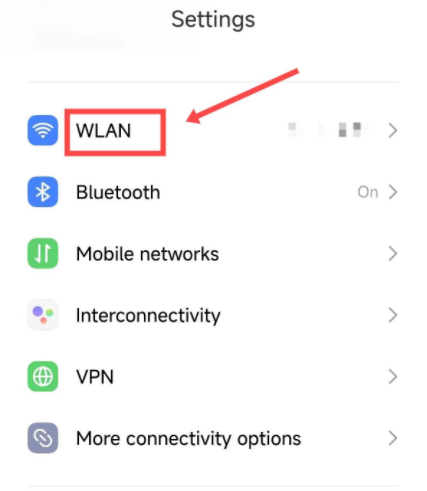
  1. Open the phone Settings and click "WLAN".

Android WLAN

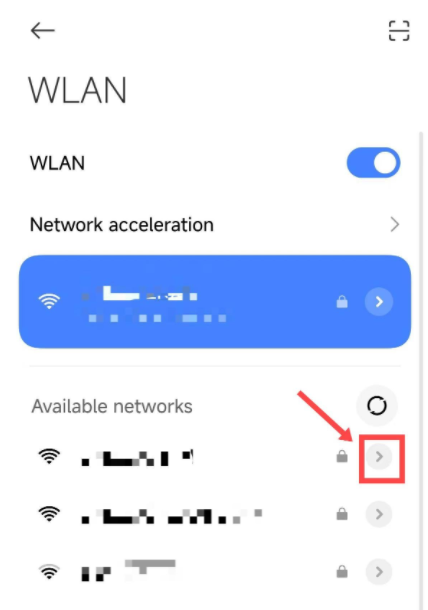
  1. Locate the connected network and click the icon on the right to enter the configuration page.

Android network config

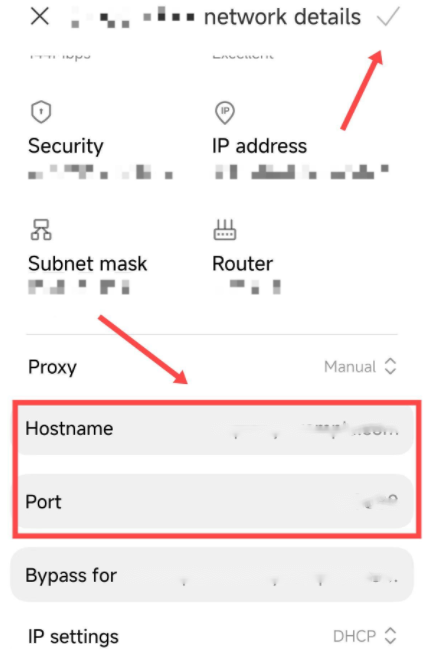
  1. On the configuration page, select "Manual", enter the hostname and port, and click the icon in the upper right corner to save the changes.

Android proxy manual

  1. Open your browser and enter your username and password.
  2. Through the browser to detect your IP, the current IP address and the proxy IP address is consistent, it means that the proxy setting is successful.

With the above steps, you have successfully completed the integration of Android and proxy, providing a more secure and flexible option for network connection.

iPhone

Before integrating proxy into your iPhone, make sure that you have set up proxy correctly to ensure that the proxy service will work properly.

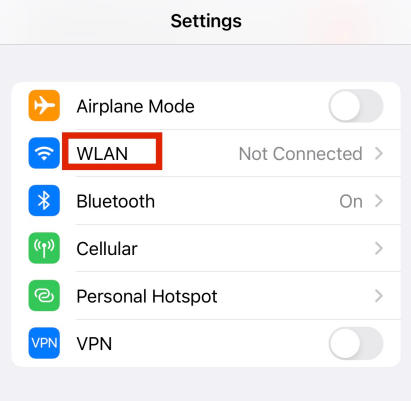
  1. Open the phone Settings and click "WLAN".

iPhone WLAN

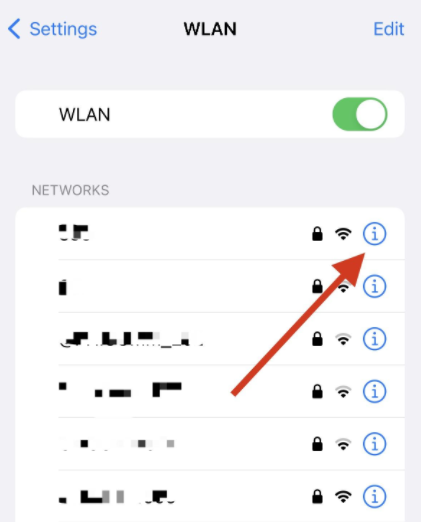
  1. Locate the connected network and click the icon on the right to go to the configuration page.

iPhone network

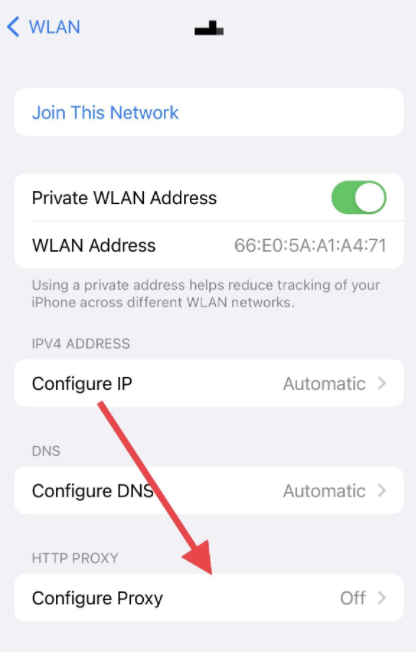
  1. On the configuration page, click "Configure Proxy".

iPhone configure proxy

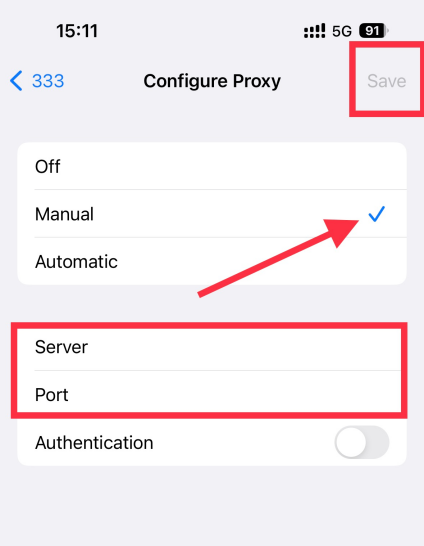
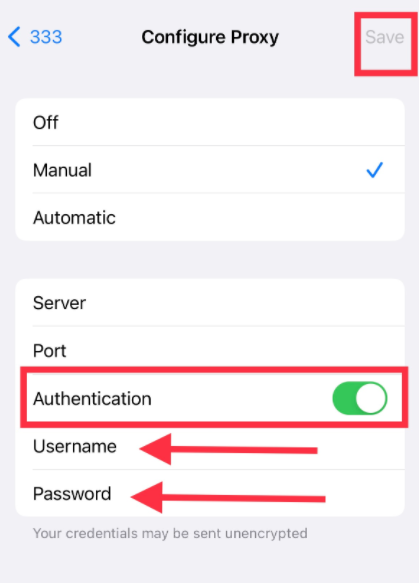
  1. On the Configure Proxy page, click "Manual" and enter the Server and Port.

iPhone manual proxy

  1. Start the "Authentication" button, fill in the Username and Password, and click "Save" in the upper right corner to save the changes.
  2. Open the browser to check your IP address. If the current IP address is the same as the proxy IP address, the proxy is successfully set.

iPhone auth

By following these steps, you've successfully integrated your iPhone with proxy, providing a more secure and flexible option for your network connection.

Scraping Bots/Robots

Stackposts

Before integrating a proxy into Stackposts, make sure you have set up the proxy correctly to guarantee that the proxy service will work properly.
  1. Open the Stackposts home page and click the Login button. Enter your username password and go to the Dashboard

Stackposts login

  1. In the Dashboard menu, select the Proxies icon
  2. You will now see all the proxies that have been added to your account

Stackposts proxies

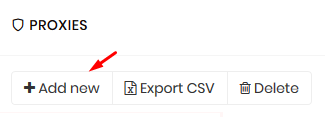
  1. For authentication through our proxy network, please select the Add New button

Stackposts add

  1. You can authenticate by the form of hostname:port:username:password

Follow the steps above and your proxy is now configured.

AIO Bot v2

Before integrating a proxy into AIO Bot v2, make sure you have set up the proxy correctly to guarantee that the proxy service will work properly.
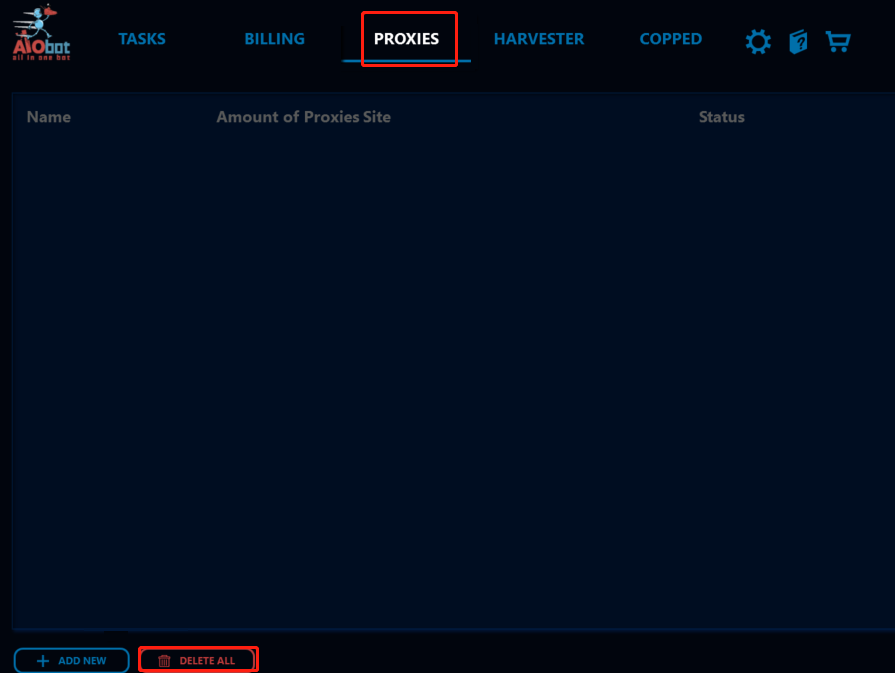
  1. To set up proxy, select the "Proxies" TAB and click ADD NEW

AIO Bot v2 proxies

  1. Enter a name for the proxy list and select the Is Enabled box
  2. Select "Normal Proxies" and paste the generated proxy list below
  3. For monitoring, you can choose to Monitoring Proxies and use our rotating proxy, changing the IP each time you use it

Follow the steps above and your proxy is now configured.

Another Nike Bot

Before integrating a proxy into Another Nike Bot, make sure you have set up the proxy correctly to guarantee that the proxy service will work properly.
  1. Click Configure -> Proxies
  2. Click New List to add your proxy
  3. Check the Enable this proxy list box
  4. Change the list type to Normal Proxy
  5. Select the target website from the drop-down menu
  6. Click Save
  7. Check Test Proxies before use

Follow the steps above and your proxy is now configured.

Nike Shoe Bot

Before integrating a proxy into Nike Shoe Bot, make sure you have set up the proxy correctly to guarantee that the proxy service will work properly.
  1. To set up a proxy in Nike Shoe Bot, go to the Proxies tab and click "Add Proxy List
  2. Paste your list into the pop-up window
  3. When you have a task for which you need shoes, select your created proxy list

Follow the steps above and your proxy is now configured.

NikeSlayer

Before integrating a proxy into NikeSlayer, make sure you have set up the proxy correctly to guarantee that the proxy service will work properly.
  1. Click on the Proxies option
  2. In the lower left corner, click Add with the server icon
  3. Fill in your host, port, username and password
  4. Adjust the number of proxies to be used for each task
  5. Once you have added the proxy, click Save Release
  6. You will be automatically taken to the home page of the target site and ready to publish

Follow the steps above and your proxy is now configured.

AIO sneaker Bot

Before integrating a proxy into AIO sneaker Bot, make sure you have set up the proxy correctly to guarantee that the proxy service will work properly.
  1. Click on "Configure" in the top menu
  2. Select Proxies
  3. Click "New List" in the lower left corner
  4. Under List Name, name the list
  5. Under List Type, select Normal Proxies
  6. Specify the sites where you want to use pxyedge's residential IPs (you can also select "All sites")
  7. Check the Enable Proxy List box
  8. enter the pxyedge entry point + port "Host or IP Address" and click Save
  9. View the dashboard for a complete list of country ports
  10. Click Save

Follow the steps above and your proxy is now configured.

EasyCop Bot

Before integrating a proxy into EasyCop Bot, make sure you have set up the proxy correctly to guarantee that the proxy service will work properly.
  1. Click "Tools", then select "Proxy List"
  2. Under "Host or IP Address", enter the host name and port number, and then click "Save"
  3. Click "Import" and verify that the proxy is enabled
  4. Click Save

Follow the steps above and your proxy is now configured.

Supreme Bot

Before integrating a proxy into Supreme Bot, make sure you have set up the proxy correctly to guarantee that the proxy service will work properly.
  1. For each thread in Supreme Bot, you have the option of assigning a proxy.
  2. The format for adding a single proxy

Follow the steps above and your proxy is now configured.

Better Nike Bot

Before integrating a proxy into Better Nike Bot, make sure you have set up the proxy correctly to guarantee that the proxy service will work properly.
  1. Click Add/Edit Proxies
  2. Paste the proxy information extracted from PxyEdge,
  3. Check 'Do not allow real IP to any account', click OK
  4. BetterNikeBot will automatically check if the proxy is connected successfully

Follow the steps above and your proxy is now configured.

SENukeTNG

Before integrating a proxy into SENukeTNG, make sure you have set up the proxy correctly to guarantee that the proxy service will work properly.
  1. Open ProjectMaker in the ZennoPoster application to create or edit your project.
  2. If you already have a project, click the "Open" button. If you are creating a new project, click the "Record" button.
  3. Then click on the Proxy tab and you can see the available proxy settings on the page. To use a custom proxy on this application, check the Use proxy option.
  4. When the "Use proxy" option is selected, the radio button will become visible. Click the "Custom Proxy" option and then click the "Add Proxy List" button.
  5. If you are not using a whitelist IP, be sure to fill in your proxy username and password.
  6. Now you can add proxies to the list. Depending on your needs, you can select a specific endpoint or the entire list of proxies generated on the Pxyedge Dashboard.
  7. When the proxy list is ready, click the "Add Proxy List" button to continue the setup.
  8. At this point, your proxy is ready for use. However, if you want to be sure, you can also run a check by clicking the "Test Proxy" button in the proxy settings.
  9. After completing the proxy or general settings test, click "Save".

Follow the steps above and your proxy is now configured.

Screaming Frog

Before integrating a proxy into Screaming Frog, make sure you have set up the proxy correctly to guarantee that the proxy service will work properly.
  1. Open Screaming Frog
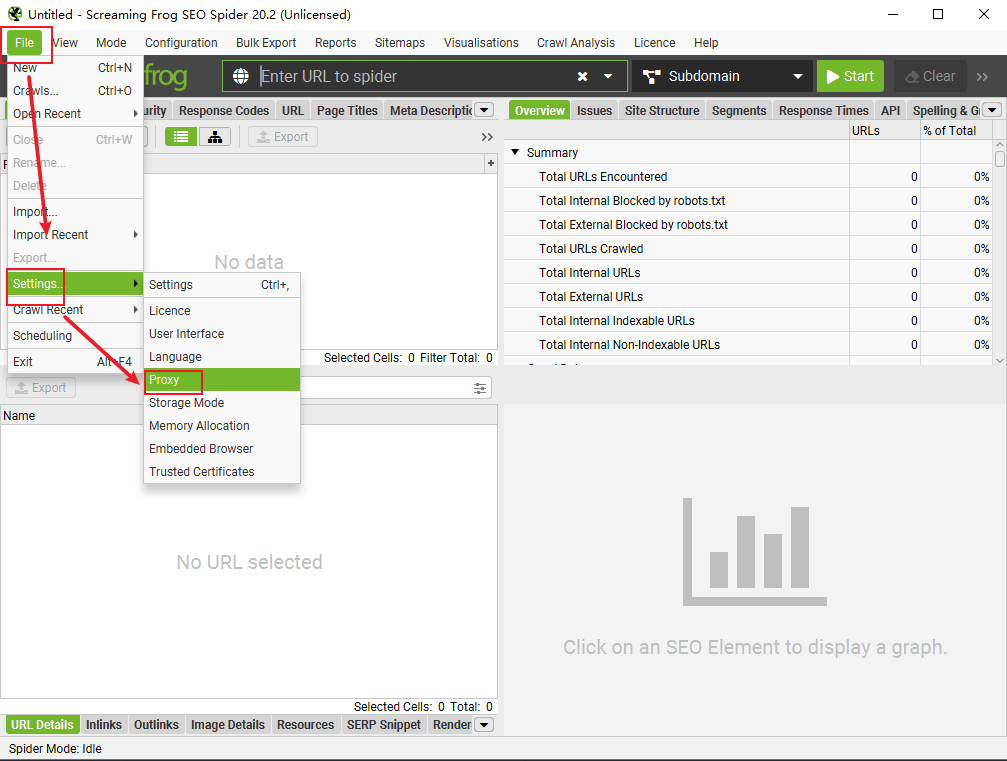
  2. Click on the File in the upper navigation bar and navigate to Settings->Proxy

Screaming Frog settings

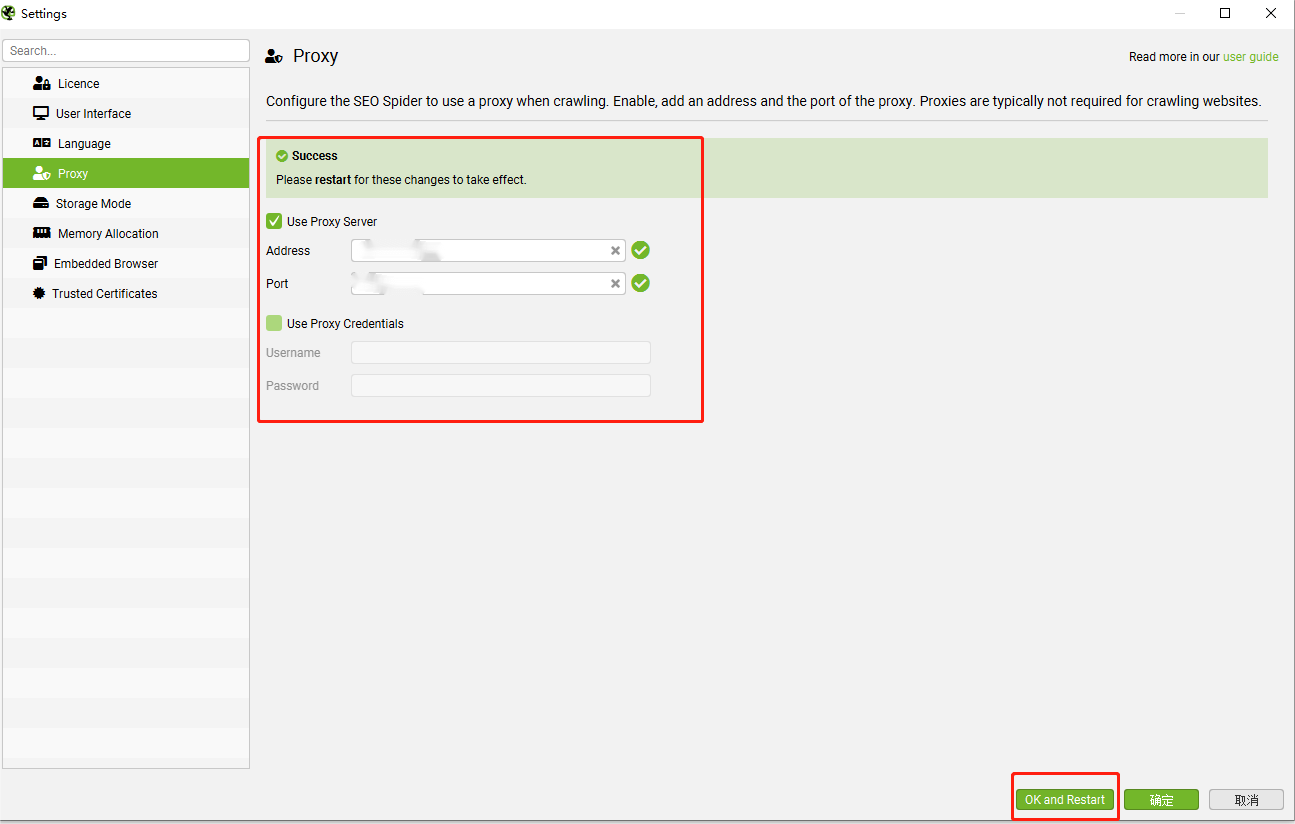
  1. Check Use Proxy Server, enter the address and port of the proxy server, click OK and restart

Screaming Frog proxy

  1. After the application restarts, you will be prompted to enter your proxy authentication details when you try to grab the URL at the top of the window. Enter your username and password and click "OK
  2. Screaming Frog will now use the proxy to grab the incoming URL, bypassing any obstacles

Follow the steps above and your proxy is now configured.

ZennoPoster

Before integrating a proxy into ZennoPoster, make sure you have set up the proxy correctly to guarantee that the proxy service will work properly.
  1. On ZennoPoster, open ProjectMaker to create or edit your project
  2. If you have an existing project, click "Open". If you are creating a new project, click "Record"
  3. To test the proxy, you first need to find a target website. Change the "about:startpage" line to your target site and click the "Go" button
  4. You should now see your path in the "Projects" tab
  5. Right-click on the path box, select Add Action, find Browser, and select Settings
  6. At this point, you will see an undefined action box available. If it is outside your path box, click and drag it back into the path box. Make sure to start with the path to the undefined action you just created
  7. Click the Undefined Actions box on the Action Properties tab. Click the Select Action button and then select Set Proxy Action
  8. ZennoPoster accepts the format "username:password@ip:port". Use it according to the endpoints and sub-users you want to use. To enter proxy details, edit the fields below the Set Proxy action. You can rename the box itself as needed by editing the field below the Action Properties. If your IP is whitelisted, you can simply use the "Hostname: Port" format
  9. Your project is now ready. Click on the "Restart" button, select the "Yes, Step-by-Step" option at the prompt, and save
  10. To test the project, click the "Play" button and wait for the page to load

Follow the steps above and your proxy is now configured.

Axios

Before integrating a proxy into Axios, make sure you have set up the proxy correctly to guarantee that the proxy service will work properly.
  1. Open the Proxy Setup tab
  2. Navigate to the Endpoint Generator
  3. Configure the parameters according to your needs. Set your authentication method, location, and session type. The protocol is configured in the code
  4. Choose the number of proxy endpoints you want to generate (default value - 10)
  5. Copy the endpoints

Follow the steps above and your proxy is now configured.

Parsehub

Before integrating a proxy into Parsehub, make sure you have set up the proxy correctly to guarantee that the proxy service will work properly. Click here to see how to set up the proxy.
  1. Open the Parsehub application
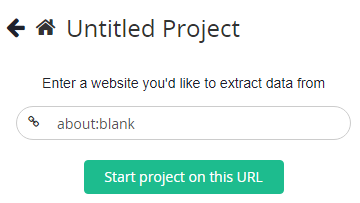
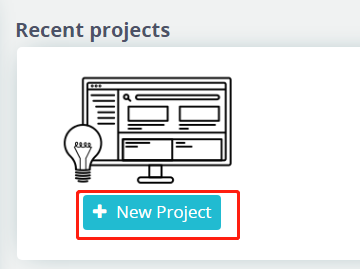
  2. Click New Project. If you already have a project, skip to step 4 of this tutorial

Parsehub new project

  1. Enter the website from which you want to extract the data

Parsehub website

  1. When your project is ready, switch to Browse Mode

Parsehub browse mode

  1. When the browser slider turns green, open the tab from the drop-down menu in the upper right corner
  2. Click the Options button and select the Advanced option
  3. In the Advanced window, click the Network tab and select Settings
  4. In the Settings menu, under Configure Proxy to Access the Internet, select Manual Proxy Configuration and fill in the text fields for HTTP Proxy, SSL Proxy, and FTP Proxy with the information from the desired endpoints
  5. Make sure the SOCKS Host text field is empty. To check that everything is working properly, go back to the project page and refresh the browser tab

Follow the steps above and your proxy is now configured.

Octoparse

Before integrating a proxy into Octoparse, make sure you have set up the proxy correctly to guarantee that the proxy service will work properly.


  1. Open the Octoparse application.
  2. In the upper left menu, hover over the New button and click Advanced Mode. For testing purposes, we will create a custom task.
  3. In the Website field, indicate the website from which you want to extract data. Then click the Save button.
  4. You should now find yourself in the Tasks tab. To configure our proxy, select the Settings button.
  5. In the popup menu, scroll down to Anti-blocking settings and check the Use IP proxies option. You should now be able to click the Settings button.
  6. In the Proxy Settings pop-up window, define the proxy to use. Since Octoparse only provides format-based authentication of the proxy network, you will need to use our whitelist IP feature to skip traditional authentication when passing through the proxy.
  7. Once IP:PORT is ready, select a rotation interval based on your session type. If you are using a rotating session type, set the interval to 1. If you are using a sticky session, set it to 600. Finally, click the OK button.
  8. To verify that everything is working correctly, look for a check mark next to the Settings option under Anti-blocking Settings. Once confirmed, click Save to continue.
  9. To extract data from our sample page, click on the IP address you can see at the top of the Octoparse application and select Extract text of the selected element.
  10. When finished, click Save and then Run.
  11. Depending on how you want to run the task, select one of the available extraction options. For testing purposes, you can run the task on the device.
  12. If done correctly, you should see our proxy IP in the extracted data table after the task is completed.

Through the above steps, you have successfully completed the integration of Octoparse and proxy, which provides a more secure and flexible option for network connection.

Follow Liker

Before integrating a proxy into Follow Liker, make sure you have set up the proxy correctly to ensure that the proxy service will work properly.

  1. The Follow Liker app does not accept the function variable name:port , so you need to convert it to IP:port proxy format first.
  2. When opening the application, you have two options:
    • a) Enter the proxy list in the Proxy Manager.
    • b) Assign the proxy directly to the account.
  3. To import the list, click Tools > Proxy Manager.
  4. Select a proxy list (the format must be IP: Port: Username: Password, or if you are using whitelist IP authentication - just IP: Port). You can also assign a proxy directly to an account when adding or editing a proxy.

Through the above steps, you have successfully completed the integration of Follow Liker and proxy, which provides a more secure and flexible option for network connection.

PVACreator

Before integrating a proxy into PVACreator, make sure you have set up the proxy correctly to guarantee that the proxy service will work properly.
  1. Open PVACreator and click Proxy. Then click Import to import the proxy.
  2. Select your proxy list file.
  3. After importing the proxy, click Save.
  4. Then you need to bind the proxy to your campaign. We are using Instagram campaign in our example.
  5. After opening the campaign, go to the list of proxies, click on the Proxy column to select it, and then bind the proxy.
  6. To save your changes, click "Save".

Through the above steps, you have successfully completed the integration of PVACreator and proxy, which provides a more secure and flexible option for network connection.

ScrapeBox

Before integrating a proxy into ScrapeBox, please make sure you have set up the proxy correctly to guarantee that the proxy service will run properly.

  1. Open the ScrapeBox application.
  2. Check the Use Proxy field in Select Harvester and Proxy settings.
  3. Click the Edit button to start setting up your proxy.
  4. Enter the generated Pxyedge user credentials and other details according to the authentication method you want to use, then save your changes.
  5. You can now see your proxy in the Select Harvester and Proxies box.
  6. Select all the entered proxies and click the Modify button.
  7. Click on the option to mark all proxies as non-sock proxies. If you have done this correctly, you should see the letter N under each of the entered proxies in the S field of the proxy table.
  8. You can configure the rest of the ScrapeBox settings as needed. To test if you are using a proxy, simply check if the Harvester status shows "Proxies Enabled".

Through the above steps, you have successfully completed the integration of ScrapeBox and proxy, which provides a more secure and flexible option for network connection.

Apify

Before integrating the proxy with Apify, please make sure you have set up the proxy correctly to guarantee the proxy service will work properly. Click here to see how to set up the proxy.
  1. Login to your Apify account.
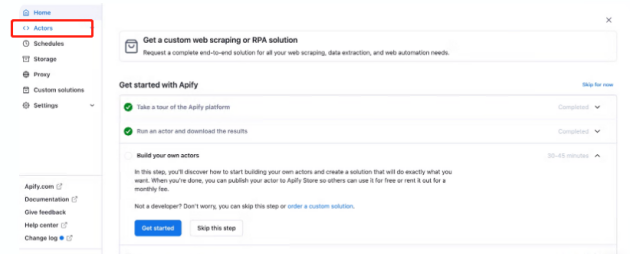
  2. Navigate to the left menu and select Actors.

Apify actors

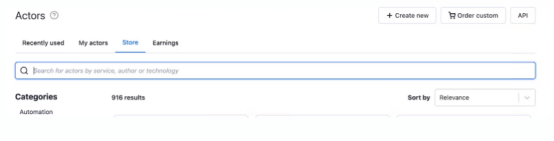
  1. Select the Store section. Here, select the tools you need based on your crawl project goals. You can browse categories or use search. In our example, we will use Web Scraper participant.

Apify store

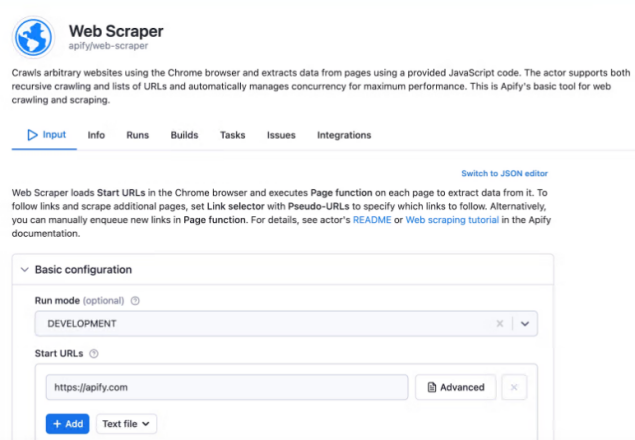
  1. In the Input section, select Basic Configuration where you can enter the target URL.

Apify input

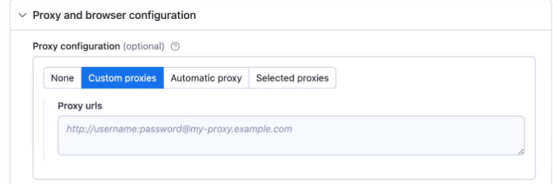
  1. Scroll down to the Proxy and browser configuration and find the proxy configuration section. Here, select Custom proxies to change the proxy settings.

Apify proxy

  1. Depending on your authentication method, enter your IP address and port, as well as the Pxyedge user credentials and other details you created.
  2. To complete the proxy configuration process, click "Start".
  3. After the web crawling process is complete, you can preview the data or download it in your preferred format.

Through the above steps, you have successfully completed the integration of Apify and proxy, which provides a more secure and flexible option for network connection.